15 DIY Christmas Wreath Ideas to Make at Home
Choose a greenery crescent, fabric ties, paper leaves or wrapped yarn, then explore eleven more wreaths from their original makers.

By Mustafa Demir
Updated November 20, 2026
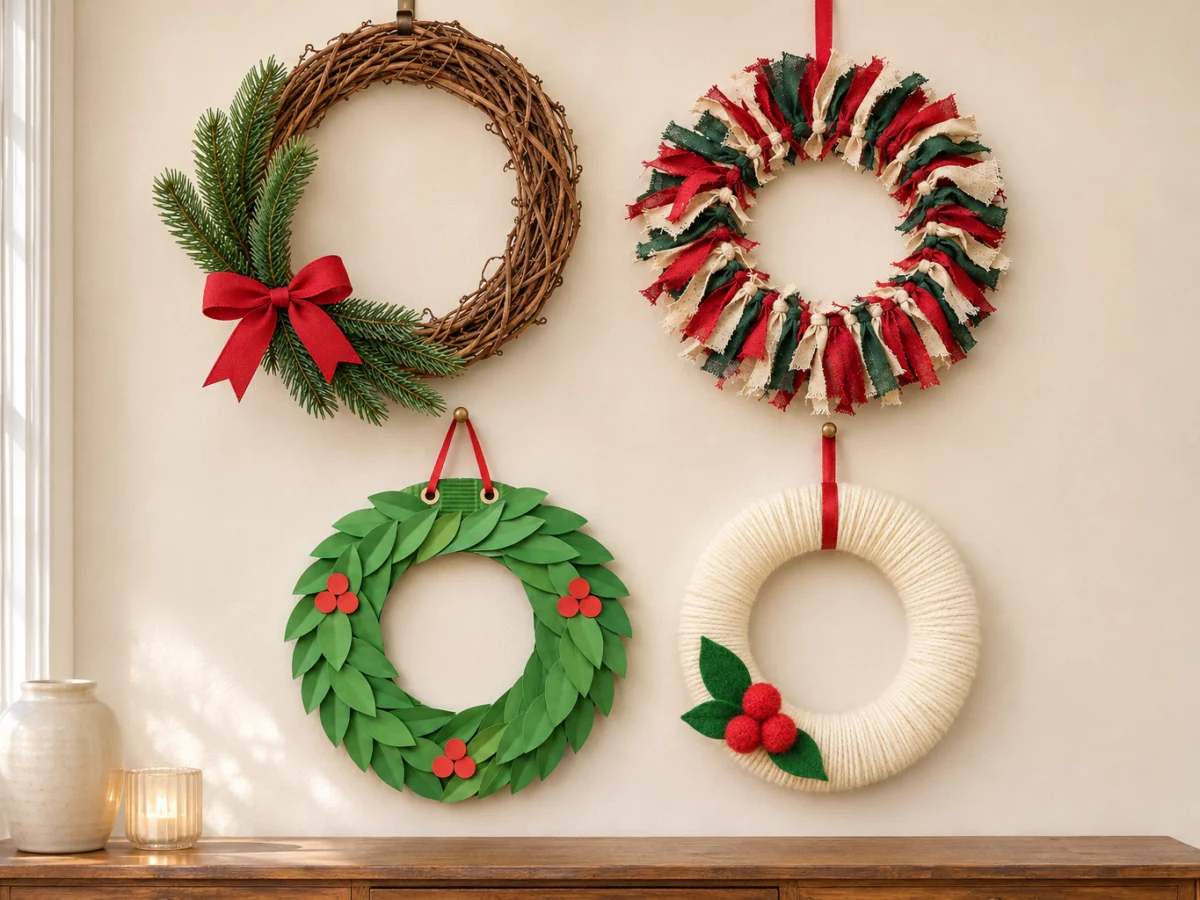
Project at a glance
- Time
- Choose a short tying or wrapping project, or allow longer for cutting, drying and detailed assembly
- Cost
- Compare supplies you already own with the cost of the correct base; prices vary
- Skill
- Beginner options plus more involved designs, with cutting and attachment choices explained
- You make
- 15 distinct Christmas wreath ideas: four complete builds here and eleven original-maker tutorials
A quick guide to this collection: Ideas 1–4 include materials and full step-by-step instructions on this page. Ideas 5–15 introduce more wreath styles with links to the original makers’ tutorials. Start with the four complete projects, or jump to ideas 5–15 to browse more wreaths.
A Christmas wreath starts with a decision about where it will hang. A paper wreath can work on an indoor wall, while a sheltered door calls for materials suited to that location. Then choose a base that can carry the decorations without bending or making the door hard to close.
These 15 DIY Christmas wreath ideas use different constructions, from fabric ties and wrapped yarn to ornaments and natural materials. The first four are original designs with complete instructions below. The other eleven are selections from credited makers, with links to their full tutorials. Their methods, patterns and photos belong to those makers.
I’d choose the fabric tie ring when I wanted to avoid glue, or the grapevine crescent when I wanted a traditional shape without covering the whole base. Start with the comparison below rather than buying decorations first. For other seasonal making, our refillable DIY Advent calendar uses everyday paper supplies too.
| Start with | What it gives you | Display choice |
|---|---|---|
| Grapevine crescent, idea 1 | A visible natural base with a small greenery arrangement | Indoors or a sheltered door with suitable faux materials |
| Fabric ties, idea 2 | A soft, full ring without adhesive | Indoors; dry fabric stays cleaner |
| Paper leaves, idea 3 | A flat, light wreath you can cut from cardstock | Indoors, away from moisture |
| Wrapped yarn, idea 4 | A smooth cream ring with a small holly accent | Indoors; keep the yarn dry |
| Maker selections, ideas 5 to 15 | Different materials and more specialized constructions | Check the linked tutorial and your actual supplies |
Four wreaths with full instructions
1. Faux greenery crescent on grapevine

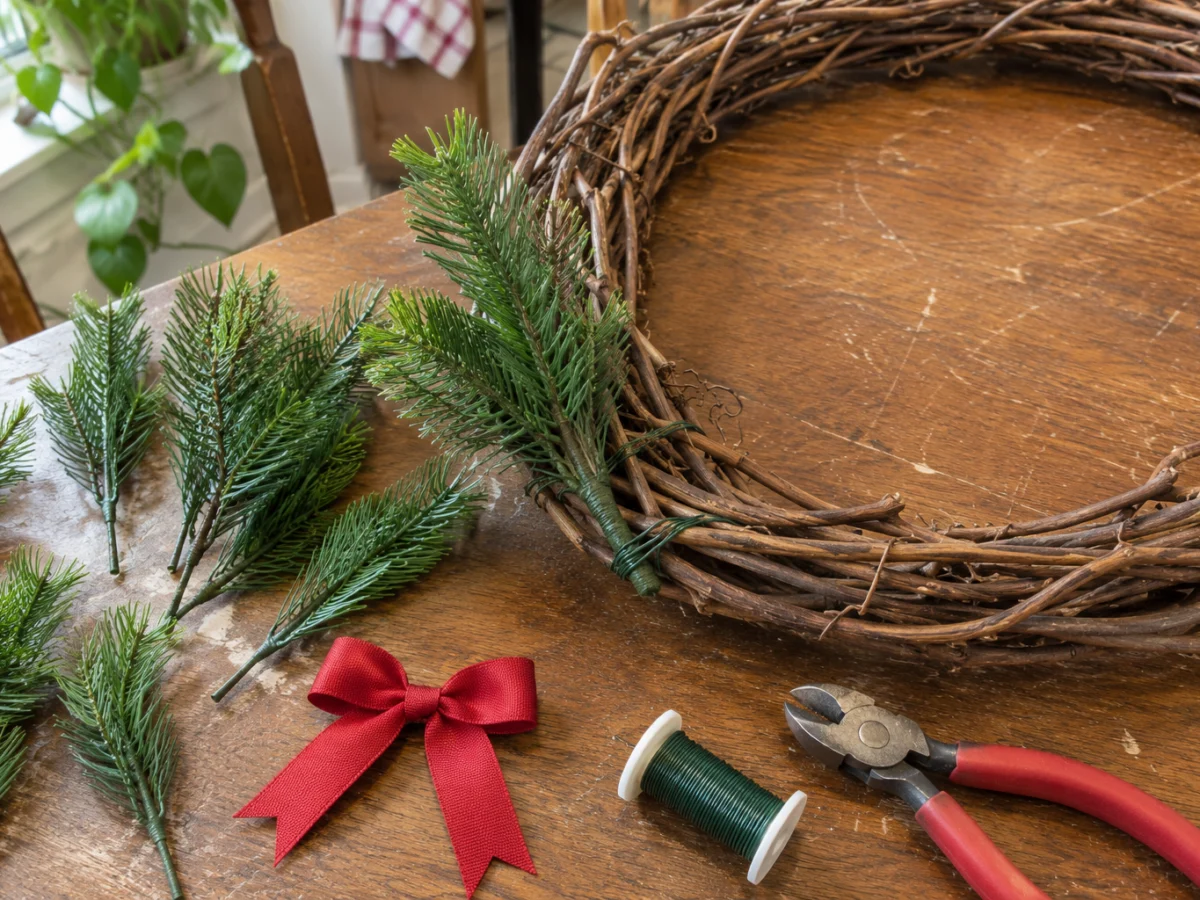
Leave some grapevine showing instead of filling the entire circle. A small evergreen crescent at the lower left gives you a clear place for a bow, and the exposed upper arc keeps the arrangement from looking crowded. This design uses wire as its main attachment, so individual sprigs can be removed later.
Materials
- One 12-inch grapevine wreath
- six faux evergreen sprigs about 8 inches long
- green 22-gauge floral wire
- wire cutters
- scissors
- 36 inches of red 1 1/2-inch ribbon for a bow
- 18 inches of narrow hanging ribbon
Make it
- Lay the wreath flat and choose its top. Position the six cut stem ends together near 7 o’clock. Aim three leafy tips upward around the left arc and three down and around toward the bottom-right arc. Overlap foliage enough to hide the stem ends, but keep the center opening clear. Trim long stems with wire cutters, leaving enough bare stem for two separate wire ties.
- Cut twelve wire pieces about 8 inches long. Start with the sprigs that will sit underneath. Pass one wire around a sprig stem and through or around a substantial grapevine, then bring the ends together behind the wreath and twist them together about three turns until snug. Add a second wire farther along that same stem. Repeat for each sprig, lifting foliage to hide the wires. Wire around firm stems, not just soft needles.
- Lift the wreath upright after attaching all six sprigs. If a tip droops away from the curve, reposition that sprig or add a small supporting wire farther out. Spread the foliage with your fingers. Keep the central stem junction compact so the bow can cover it without needing extra greenery.
- Fold the 36-inch ribbon into two loops with two tails. Pinch the center and secure it with a separate 8-inch wire, twisting the wire behind the pinched ribbon. Use those wire ends to fasten the bow to the grapevine at the stem junction. Trim the tails so neither crosses the open center. A simple tied bow also works if the ribbon holds its shape.
- Thread the narrow hanging ribbon through a strong vine at the top, bring its ends together and tie a firm double knot. Hide the knot behind the base. Check every wire end and tuck or bend it into the back so it cannot scratch the door. Hang briefly over a protected surface and gently move the base to check that no sprig slips.
Check and fix
A heavy accent pulls a crescent out of balance. Move it closer to the base or remove it rather than relying on a larger bow to hold it. If the wreath tilts, move the hanging loop slightly around the upper arc until the intended top sits upright. This arrangement is decorative; wire attachment alone does not establish outdoor weather resistance.
2. Cotton scrap tie wreath
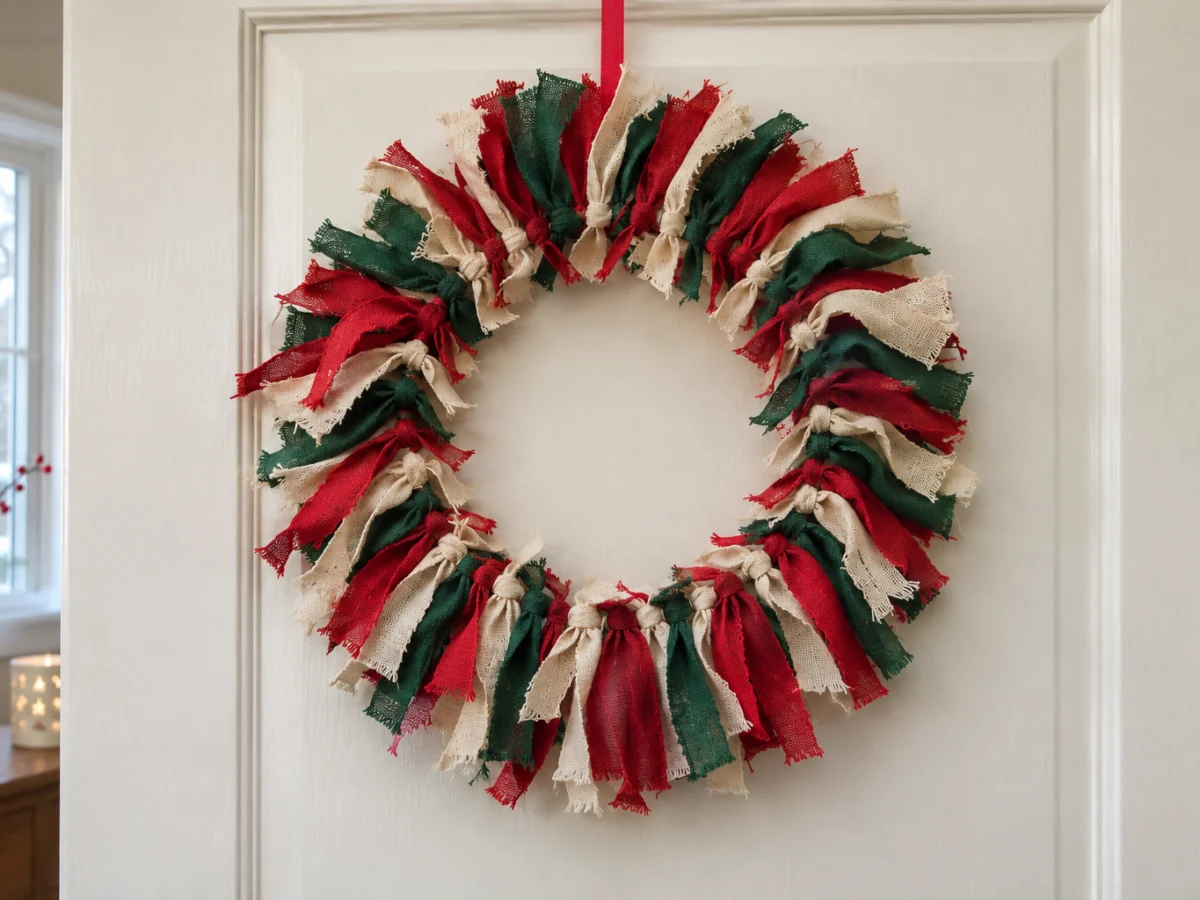
This soft ring uses repeated folded ties rather than glued fabric. Red, cream and green give it a Christmas look, but the construction works with scraps you already have. Use woven cotton of similar weight so a few thick knots do not crowd out the lighter ones.
Materials
- One 10-inch single metal craft ring
- about 60 cotton strips measuring 1 x 8 inches, plus extra fabric if needed
- scissors
- ruler
- 18 inches of narrow hanging ribbon
Make it
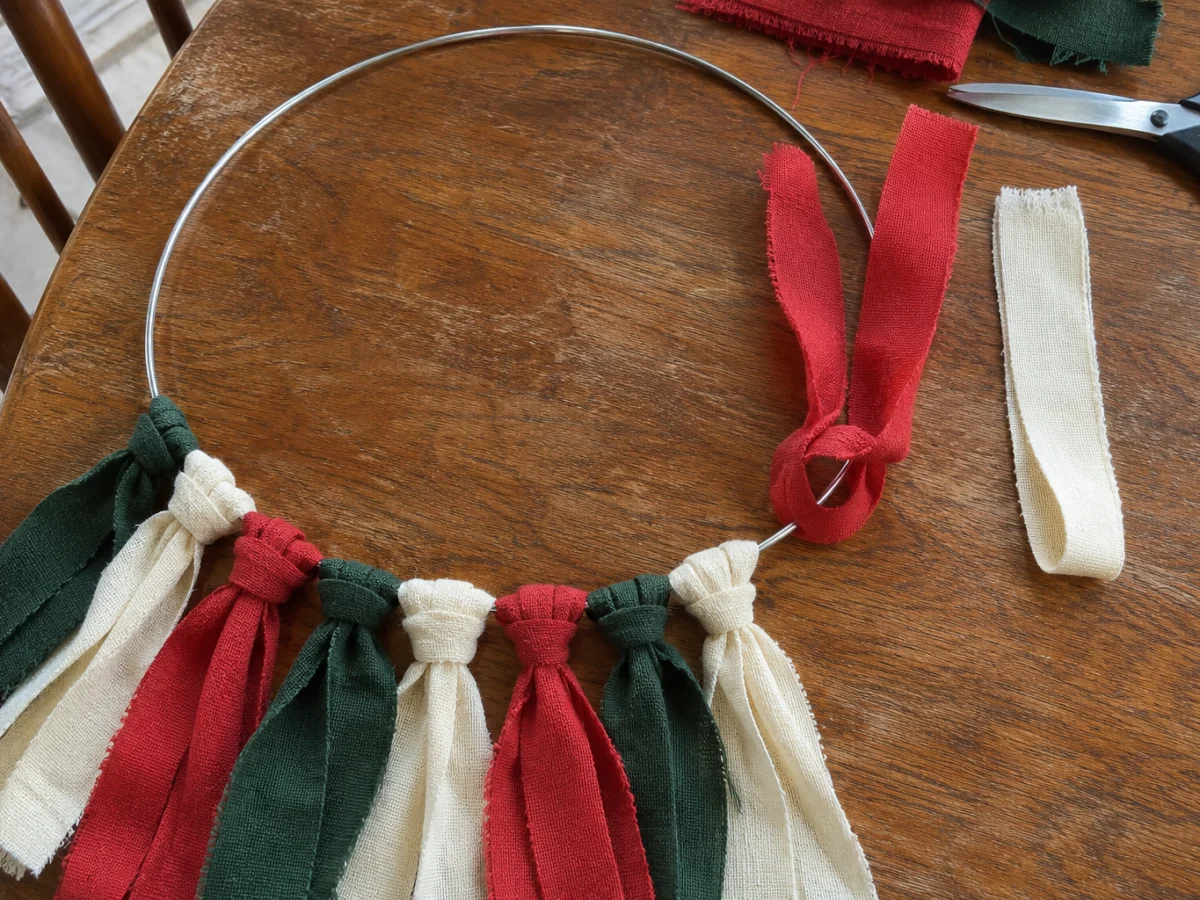
- Cut a few test strips before cutting the whole batch. Use 1 x 8 inches as the starting size. Fold one strip in half across its length so the two 4-inch tails meet. Place the folded midpoint underneath the metal ring, with the fold extending toward the center.
- Bring both loose tails over the ring and pass them through the folded loop. Pull the tails together until the loop closes snugly around the metal. This makes a folded hitch with both tails on the same side. Make three or four more and check the look. A stiffer fabric may need a slightly longer strip to pull through easily.
- Cut the remaining strips and repeat the hitch, alternating colors or using small uneven color groups. Slide each completed knot close to the previous one. Start with about 60 strips, then add more if metal shows when you spread the tails. Ring thickness, cloth thickness and how tightly you pack the knots change the final count.
- Before filling the last gap, tie the hanging ribbon directly around the exposed metal ring. Knot its ends together to form a loop. Finish adding fabric around it, leaving the hanging loop accessible. Turn the wreath over and spread the tails so the knots sit evenly around the circle.
- Hang the wreath indoors and trim only the tails that look noticeably longer. Do not trim all the ends into a hard circle unless that is the finish you want. Tug each pair of tails gently; a loose hitch needs cinching again. The fabric should stay on the ring when you lift and lower it.
Check and fix
If the ring shows, add strips rather than pushing a few knots into oversized clumps. If the center closes up, use shorter tails on the inner side or choose a larger ring. Cotton cut edges can fray; remove loose threads, and avoid claiming this is washable unless you have checked the fabric, colorfastness and assembled wreath.
3. Layered paper holly wreath
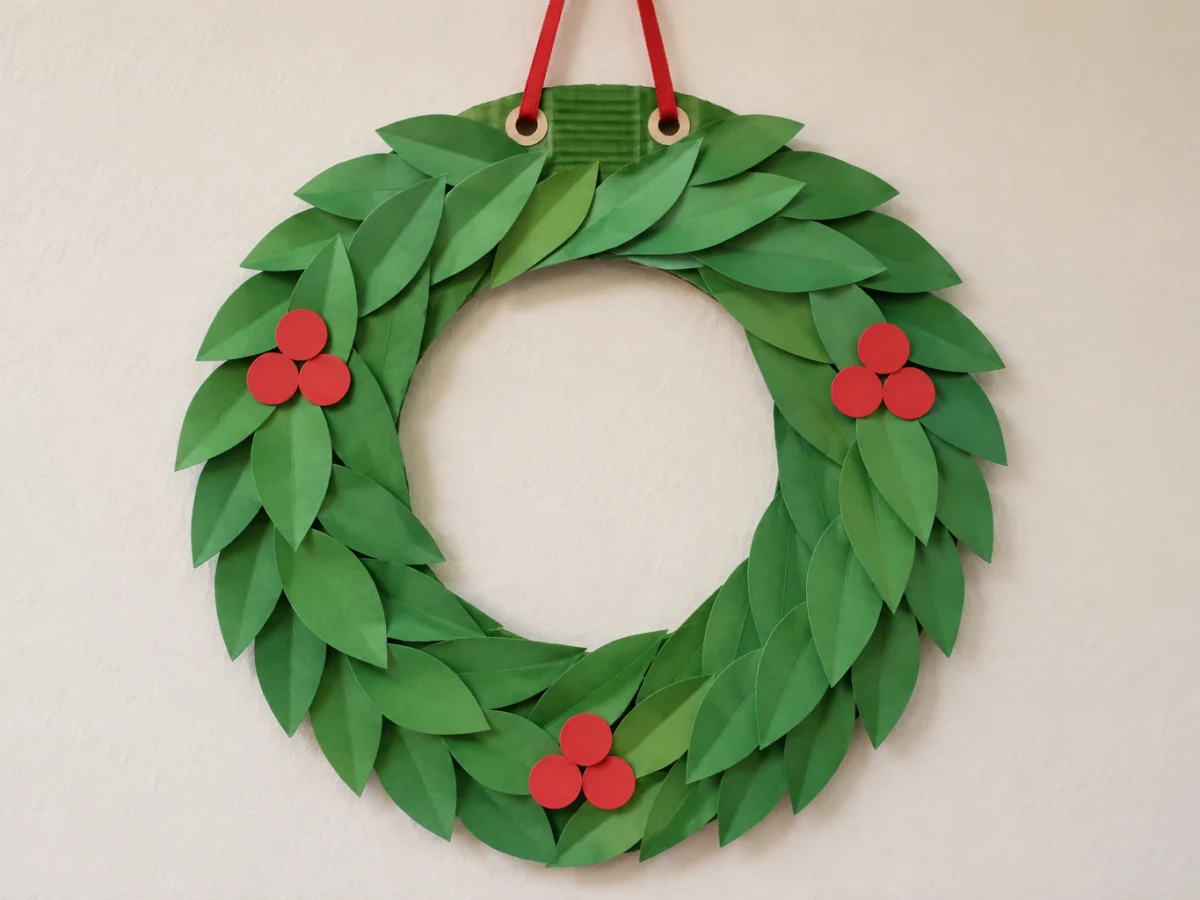
Cut leaves make a flat wreath for an indoor wall or door. A cardboard ring supports the paper, while two overlapping rows hide most of the base. The leaves below are simple pointed ovals, so you can make them with a ruler and scissors instead of a special cutting file.
Materials
- Corrugated cardboard
- green paint and brush
- green 80 lb cardstock for 48 leaves
- red paper for nine berries
- pencil, ruler, compass or two round objects
- scissors
- craft glue
- hole punch
- two small cardboard reinforcement patches
- 18 inches of narrow ribbon
Make it
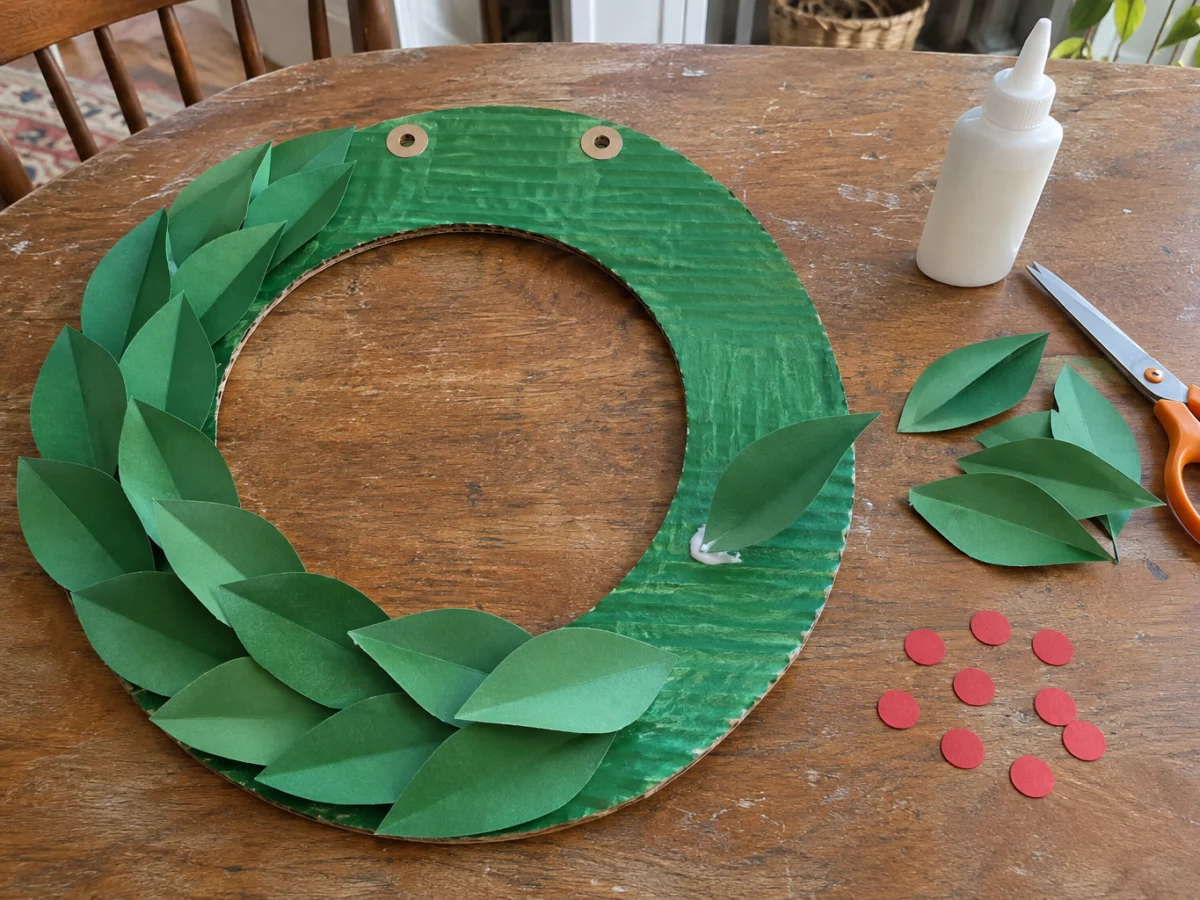
- Draw a 10-inch outer circle and a centered 6-inch inner circle on the cardboard. Cut both lines to make a ring with a 2-inch-wide band. An adult should handle difficult cardboard cutting. Paint the front and exposed edges green and let the paint dry. Cut two cardboard patches about 1 inch square, glue them to the back near the top and allow them to dry.
- Punch two holes through the ring and reinforcement patches at 12 o’clock, about 1 inch apart and at least 1/2 inch from either cut edge. Thread one ribbon end through each hole from front to back. Pull the ribbon’s middle upward on the front to form the hanging loop, then tie the ends together in a firm double knot behind the ring. Check that the holes do not tear when you lift the empty ring.
- Make a 3 x 1 1/2-inch paper rectangle as a size guide. Sketch a pointed oval within it, cut it out and use it to trace 48 green leaves. Fold each leaf lengthwise, then open the fold slightly to give it a shallow ridge. Cut nine red circles about 3/8 inch across for three berry clusters.
- Dry-fit a row of leaves along the outer half of the cardboard band, all pointing clockwise. Put glue only on the bottom 1/2 inch of each leaf and press that base to the cardboard. Overlap neighboring leaves by about 1 inch, keeping each glued base beneath a neighboring leaf tip. Work around your dry-fitted arrangement, lifting tips as needed; at the join tuck the last base beneath the first tip. Adjust spacing rather than forcing a fixed leaf count into this row.
- Add a second clockwise row nearer the inner edge, staggered so its leaves cover gaps in the first row. Keep leaf tips from blocking the center opening. Use the remaining leaves where cardboard shows; 48 is a starting supply, not a requirement to crowd every leaf onto the ring. Glue the red circles into three groups of three on visible leaf surfaces. Lay the wreath flat until the adhesive is dry according to its label.
Check and fix
Lift the dry wreath by its loop and check for lifting leaf bases. Add a small amount of glue under a loose base, press and dry again. If the ring bends, use firmer cardboard before decorating rather than trying to stiffen it with more wet glue. Keep this wreath indoors: paint does not turn cardboard and cardstock into weatherproof materials.
4. Cream yarn wreath with felt holly
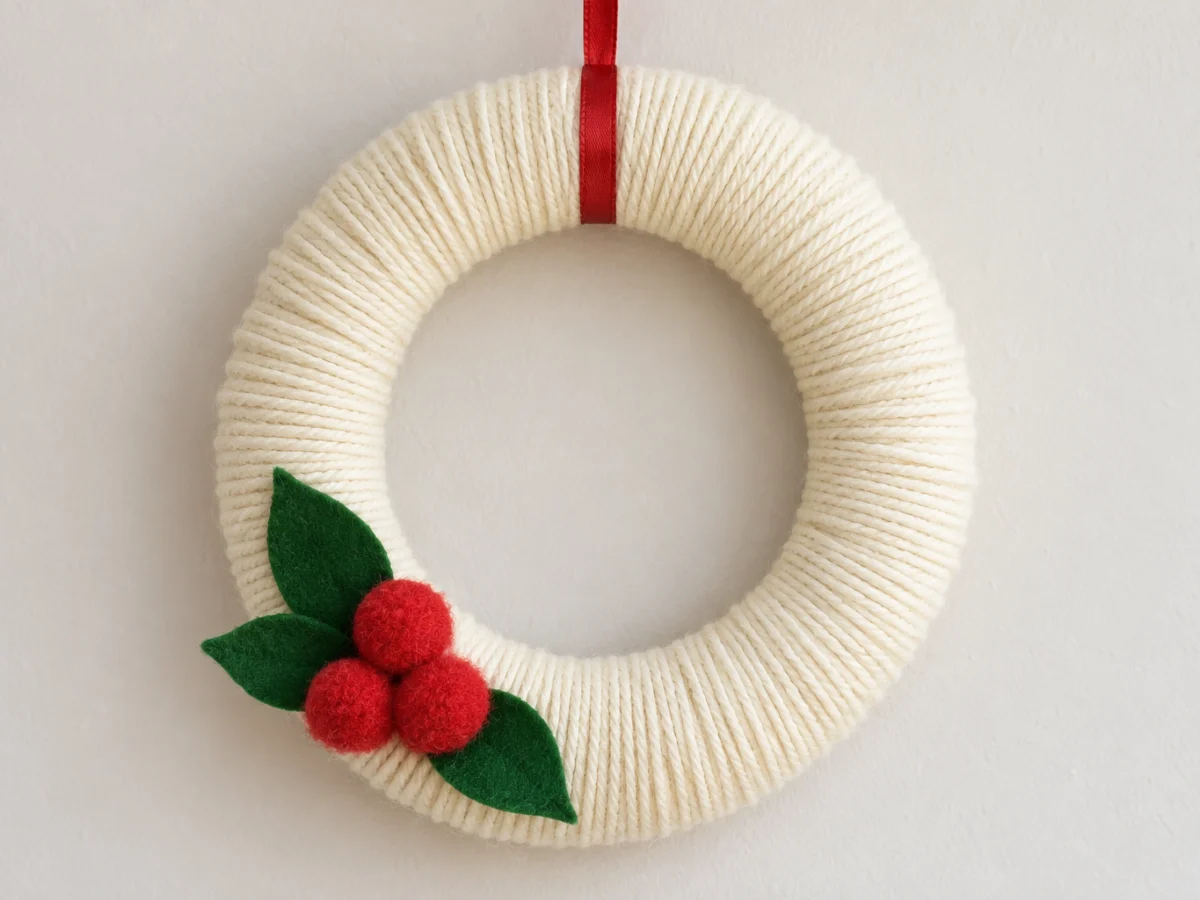
Closely wrapped yarn gives a foam ring a simple, soft surface. The holly accent stays small: three felt leaves and three red pom-poms at the lower left. This is a wrapped wreath, so you do not need to knit or crochet.
Materials
- One 10-inch foam wreath ring with about a 1 1/2-inch cross-section
- one 100-yard skein of cream worsted yarn as a starting supply
- foam-compatible tacky craft glue
- three green felt leaves 3 x 1 1/2 inches
- three red 1-inch pom-poms
- scissors
- 18 inches of narrow hanging ribbon
Make it
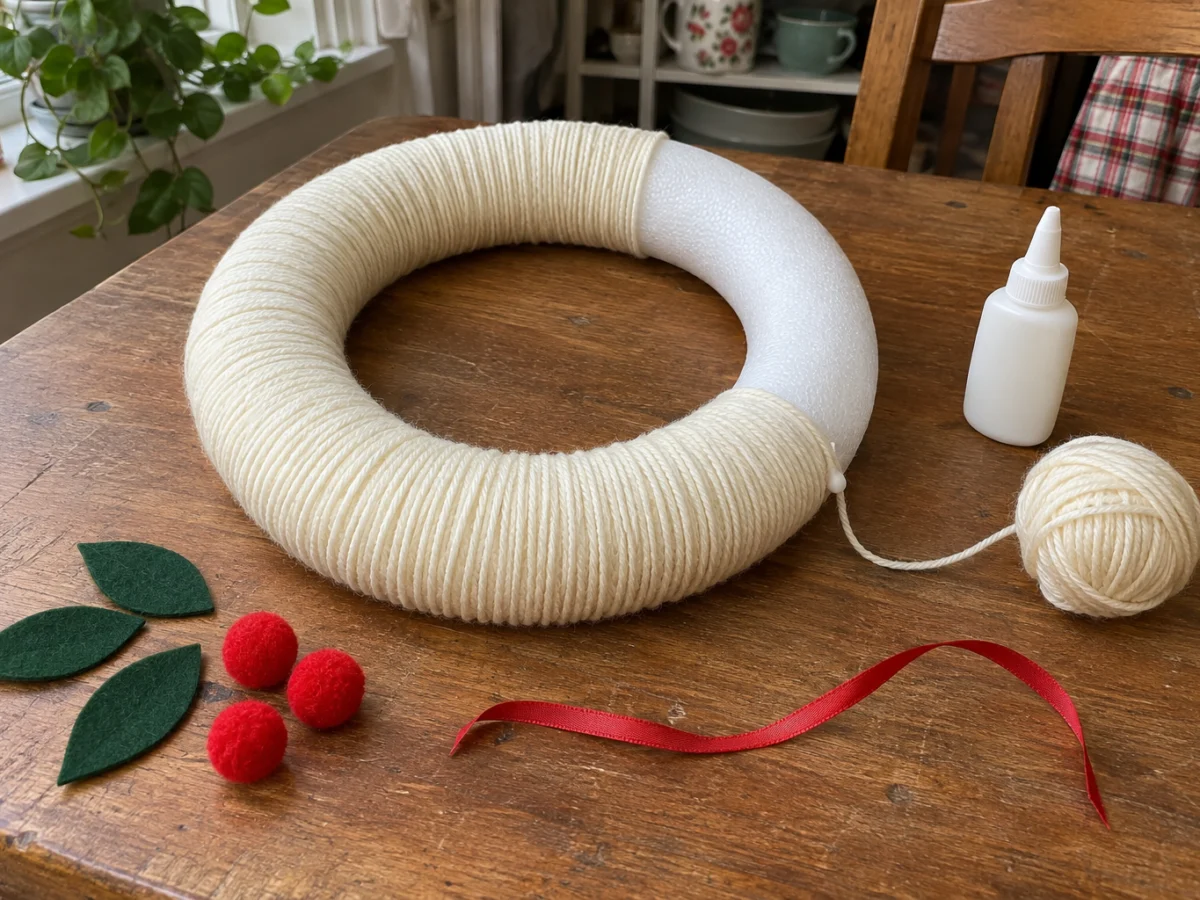
- Read the glue label to confirm it works with the actual foam and fabric. Tie the yarn around the ring with a double knot at the back, leaving a 1-inch tail. Glue that tail flat with a small dab of compatible adhesive. Let it grip before wrapping. Keep the rest of the yarn in a small ball that can pass through the ring opening.
- Pass the ball through the center and around the outer edge repeatedly. Place each turn beside the previous one, close enough to hide the foam but without crushing it. Fan the turns slightly on the outside curve and bring them closer together on the inside curve. Work in short sections, turning the ring instead of stretching yarn across its opening.
- Continue around the ring, adjusting any gaps before moving on. If you need another length of yarn, tie the old and new ends together at the back and glue the knot down. Yardage changes with ring shape and yarn thickness; have extra yarn available if the first skein will not cover the foam.
- At the end, cut the yarn with a 6-inch working tail. Thread it under five neighboring wraps on the back, knot it around one wrap, then trim to a 1-inch tail and glue that tail flat. Let the adhesive dry. Cut three pointed oval felt leaves, each about 3 x 1 1/2 inches. Arrange them as a small fan at 7 o’clock. Glue their bases to the yarn, then glue the three pom-poms over their meeting point. Let the ring lie flat for the glue’s stated drying time.
- Pass the hanging ribbon through the center at the top and around the wrapped ring, then knot the ribbon ends together above it. Lift the wreath and inspect both sides. Tuck a loose wrapping turn back beside its neighbors; repair a loose end on the back with a small amount of compatible glue. Check that the felt and pom-poms stay in place before displaying indoors.
Check and fix
Gaps usually mean the turns spread apart on the outer curve. Slide nearby turns together before adding another layer. A thick second layer can make a lumpy patch, so work evenly around the ring. Avoid using an adhesive on foam simply because it works on felt; the base material needs to be compatible too.
Natural materials and statement wreaths
5. Pinecone wreath

A closely packed surface of small pinecones gives this wreath a very different texture from loose greenery. Manda at The Merrythought builds it on grapevine and finishes it with optional velvet ribbon. I’d choose smaller cones for a modest base because large ones can quickly cover the opening and make the edge uneven. The assembly is shown in the maker’s embedded video, so open that before gathering everything if you prefer written steps.
Key supplies: Small pinecones, grapevine wreath form, hot glue and optional ribbon.
Original maker: Manda, The Merrythought. Open the original tutorial
6. Fresh pine and dried orange wreath
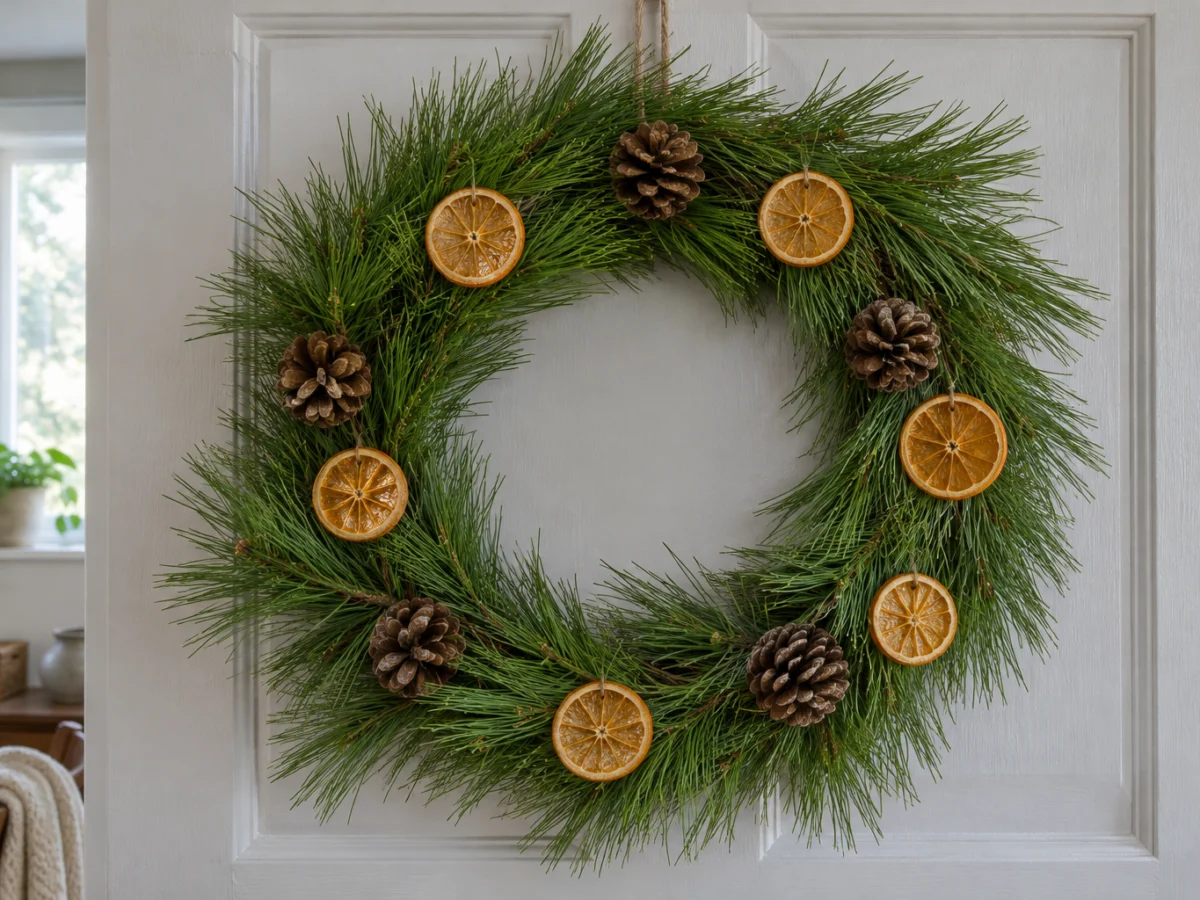
Giada Correale’s design for Pop Shop America combines flexible real pine branches with dried orange slices and pinecones. Transparent elastic thread holds the foliage around a straw base; the tutorial also explains attaching the cones and threading the orange slices through their firm pale borders. Choose this when the fresh foliage matters to you. Have the citrus fully dried before assembly, and plan for a natural wreath that will change as the greenery dries.
Key supplies: Straw base, flexible pine branches, transparent elastic thread, four to six pinecones and fully dried orange slices.
Original maker: Giada Correale, Pop Shop America. Open the original tutorial
7. Wood slice wreath
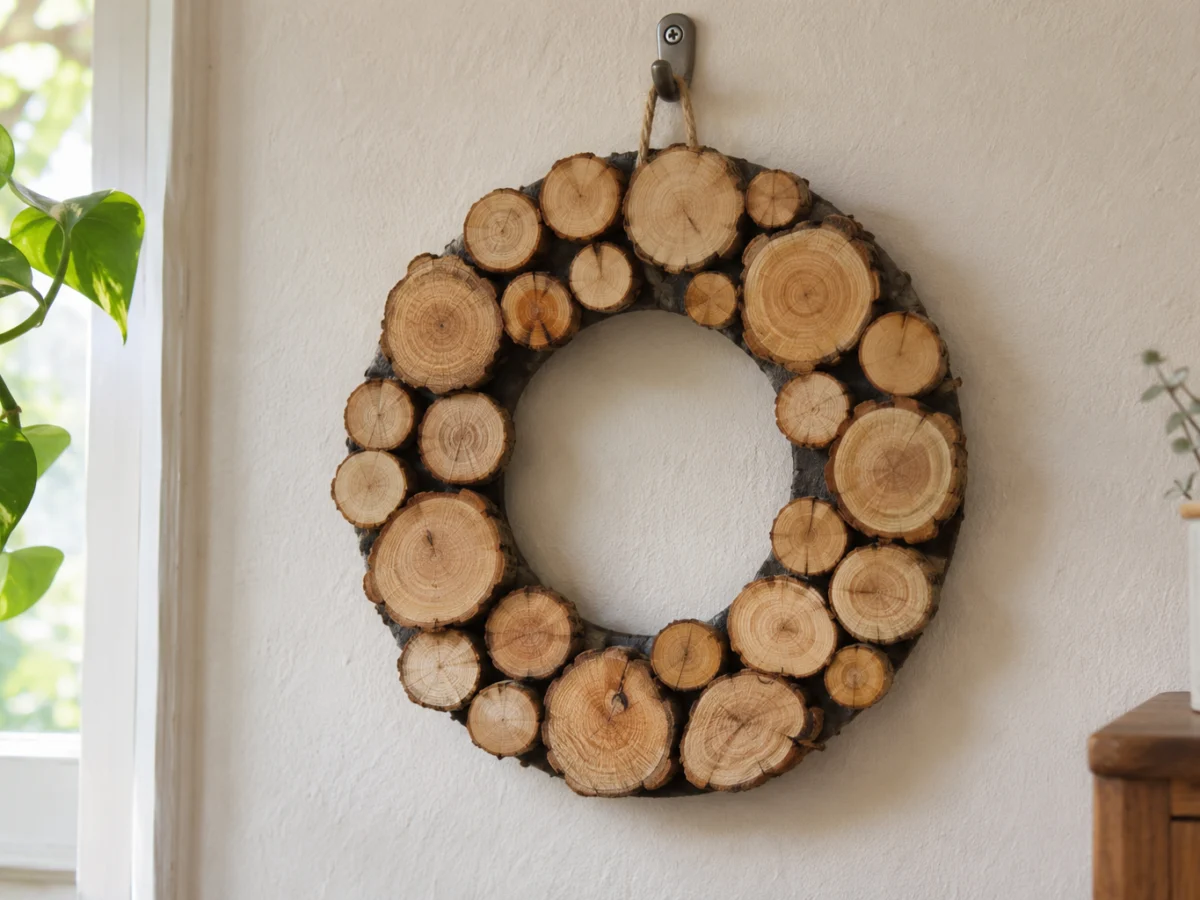
Sarah and David at Dorsey Designs use wood slices over a dark plywood ring, leaving the cut wood faces as the main decoration. Their displayed arrangement joins more than one ring, but the individual wood-covered ring is the useful starting point here. Precut dry slices avoid the branch-sawing operation if you do not have the equipment or experience. This is a heavier construction than paper or fabric, so match the hanger to the finished piece and allow the actual adhesive’s full drying time.
Key supplies: Dry wood slices, a plywood ring, background paint and an adhesive suited to the two wood surfaces.
Original maker: Sarah and David, Dorsey Designs. Open the original tutorial
8. Mini jingle bell wreath
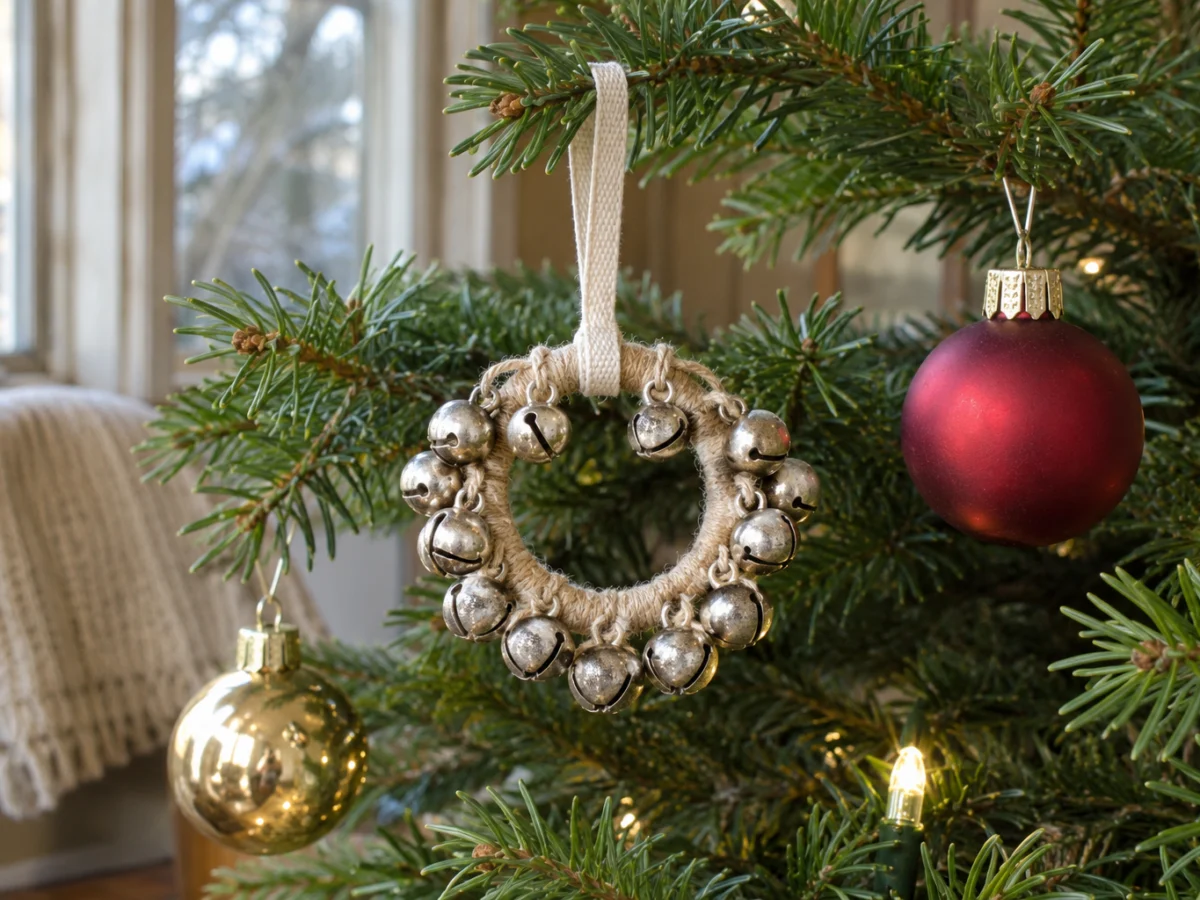
Claire at I Heart Maggie turns an empty double-sided tape roll or small hoop into a bell-covered miniature. Short lengths of twine carry the bells around the hoop, with a ribbon loop added before the last section is filled. This belongs on a tree, gift or small indoor hook rather than being treated as a full door wreath. The reused center is the useful trick, but check that your roll is firm and clean before covering it.
Key supplies: An empty tape roll or small hoop, small bells, twine and hanging ribbon.
Original maker: Claire, I Heart Maggie. Open the original tutorial
9. Oversized pool noodle wreath
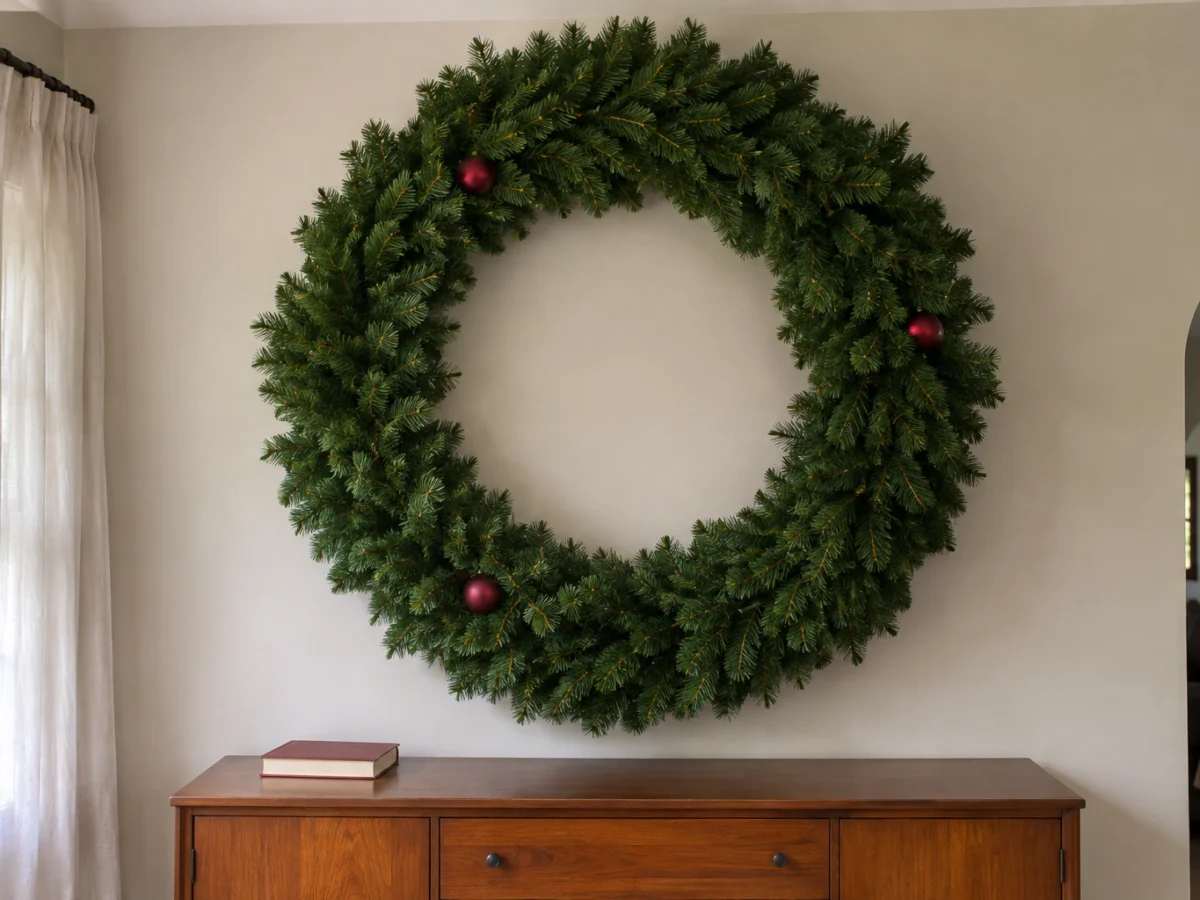
Laura Gummerman’s tutorial uses two large, connected pool-noodle circles as the foundation for an oversized greenery wreath. Offset joints help keep the taped circles from sharing one weak spot, and the example uses seven 9-foot garlands, which is a reminder to price the greenery before choosing the large size. Reserve this one for a generous wall space and follow the source for joining the base and wiring decorations.
Key supplies: At least four pool noodles, tape, substantial garland coverage and floral wire for ornaments.
Original maker: Laura Gummerman, A Beautiful Mess. Open the original tutorial
10. Vintage-style ornament wreath

Michael Wurm Jr. at Inspired by Charm builds a dense ornament wreath on a tinsel or faux-needle base. His example uses about 150 mixed-size ornaments, with smaller pieces and reserved greenery filling gaps; it suits replaceable ornaments you are happy to glue, including the source’s suggested shatterproof option. Keep sentimental or valuable pieces out of a glued construction unless you accept that they may not come off intact. Mixed sizes matter more here than buying every ornament in one diameter.
Key supplies: A tinsel or faux-needle wreath, many mixed-size ornaments and the adhesive specified in the tutorial.
Original maker: Michael Wurm Jr., Inspired by Charm. Open the original tutorial
Soft textures and paper wreaths
11. White felt leaf wreath
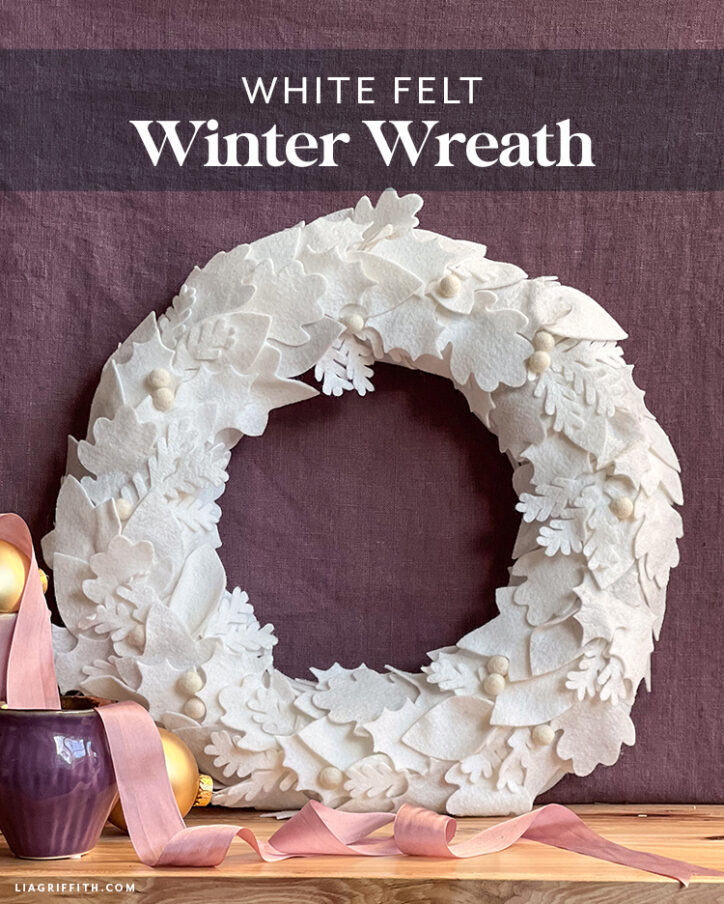
The Lia Griffith team’s winter wreath layers pale felt leaves over a covered straw form for a detailed, soft finish. It is a good choice when you enjoy repeated cutting and careful placement. The pattern and complete tutorial require a membership or one-time purchase, so this is a paid resource, not a free printable. Check that access and the cutting method suit you before buying felt; the maker recommends a cutting machine because of the number of pieces.
Key supplies: A 14-inch straw form, light crepe paper, wool-blend felt, small felt balls and access to the maker’s paid pattern/tutorial.
Original maker: Lia Griffith team. Paid resource. View the paid pattern and tutorial
12. Woven Danish paper star wreath
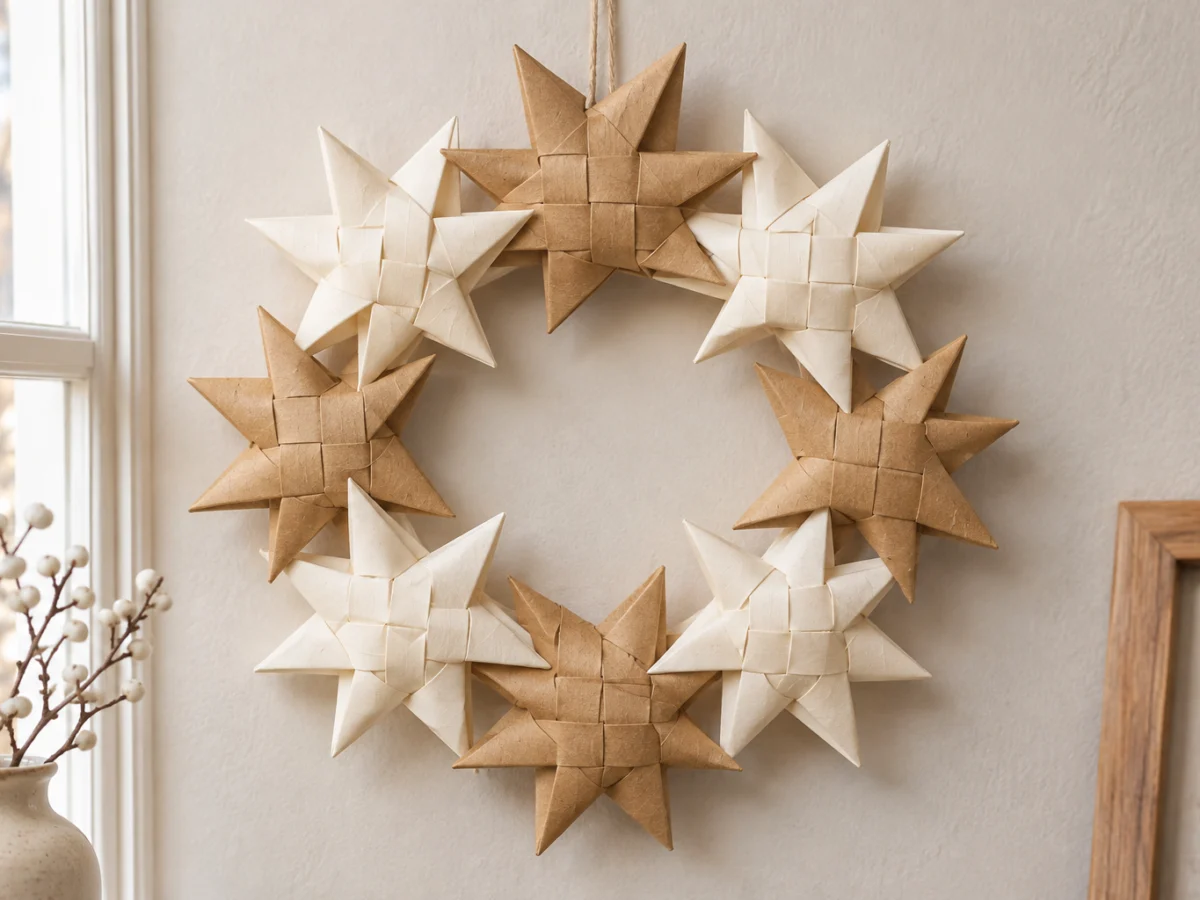
Hyggestyle connects eight woven paper stars into a wreath, with glued points forming the joins. This gives you an angular open shape rather than a leafy ring. Make one star from the linked folding instructions before cutting the full batch: straight strips and the correct length-to-width ratio affect whether the folds work. The source suggests strips 30 times as long as they are wide; choose this for an indoor display where the folded points will not be crushed by a closing door.
Key supplies: Straight paper strips, glue, a hanging loop and the source’s linked star-folding instructions.
Original maker: Hyggestyle. Open the original tutorial
13. Pom-pom snowball wreath

Haeley Giambalvo at Design Improvised mixes larger handmade yarn pom-poms with smaller purchased pom-poms for a snowball effect. The smaller pieces fill gaps and sides instead of leaving the foam exposed between large balls. It is a different construction from the smooth wrapped yarn ring above, and it uses more yarn and repeated assembly. If you are making the larger pom-poms yourself, our pom-pom crafts guide can help you plan what to do with extra yarn; follow Haeley’s tutorial for this wreath’s placement and attachment.
Key supplies: A foam wreath form, about 20 handmade yarn pom-poms, smaller craft pom-poms and optional cotton balls.
Original maker: Haeley Giambalvo, Design Improvised. Open the original tutorial
14. Burlap bubble wreath with Christmas trim
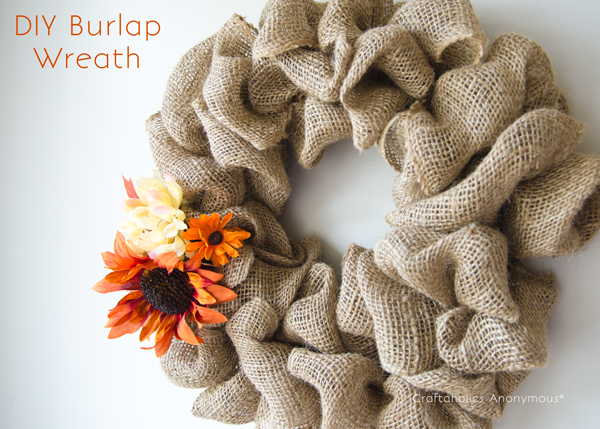
Linda at Craftaholics Anonymous shows how to pull wide burlap into loops through a multiwire wreath frame. The linked example has fall decorations; adding a Christmas bow or suitable ornaments is our styling suggestion, while the credited bubble construction stays the same. Choose this if you want gathered volume without cutting and tying dozens of fabric strips. The example uses about 22 feet of 6-inch-wide burlap on a 12-inch frame, but the fullness you choose affects how far a roll goes.
Key supplies: A 12-inch multiwire frame, 6-inch-wide burlap ribbon and separate Christmas trim.
Original maker: Linda, Craftaholics Anonymous. Open the original tutorial
15. Coffee filter ruffle wreath
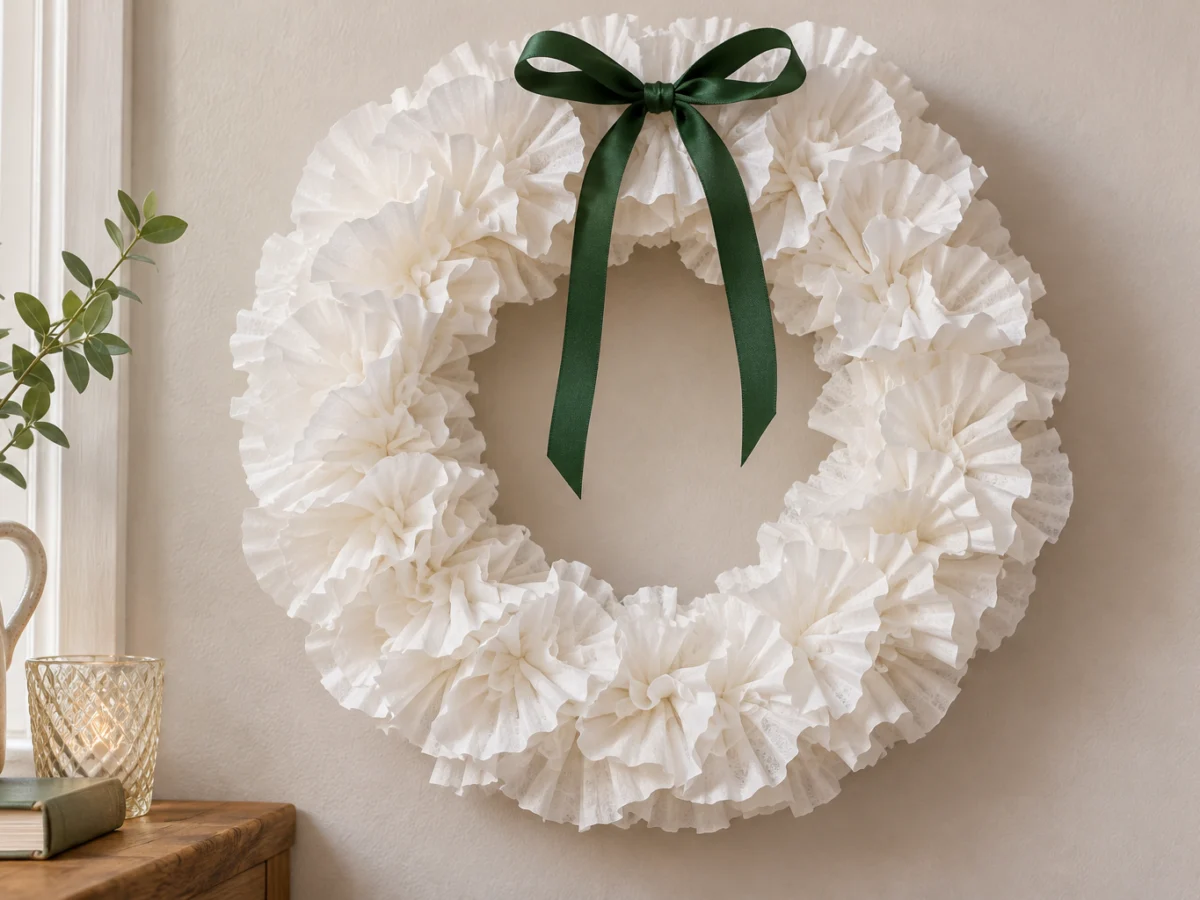
Simone at Intensely Distracted makes a full white wreath from layered, quarter-folded coffee filters. A covered foam base supports the ruffles, with the back left clear enough to sit flat. Christmas ribbon is our seasonal styling suggestion for this general wreath method, which is an indoor choice with substantial repetitive gluing: the source’s large example used just under 800 filters. Check the size you want before buying supplies, and do not assume a white paper finish can tolerate a damp doorway.
Key supplies: A foam wreath form, many plain coffee filters, appropriate glue and optional Christmas ribbon.
Original maker: Simone, Intensely Distracted. Open the original tutorial
Hang the wreath without fighting the door
Choose the hanging method after checking the completed wreath’s weight and depth. A metal over-door hanger needs enough clearance for the door to shut freely. Close the door slowly with the empty hanger first. If it rubs the frame or keeps the latch from closing normally, use another location or a suitable attachment method.
If you use an adhesive hook, follow that exact product’s surface, cleaning, temperature, weight and waiting-time instructions. A hook suitable for one painted indoor surface is not automatically suitable for an outdoor door, glass or a different finish. Attach a loop to the wreath’s actual base, rather than relying on a paper leaf, a yarn strand or a decorative bow to carry the weight.
Check the back for exposed wire and rough edges. Keep a wreath out of the path of a handle, doorbell and moving door parts. A sheltered doorway still receives damp air and blown rain; the paper, fabric and yarn builds here are intended for indoor display. For the grapevine version, check the faux greenery and ribbon supplier’s outdoor guidance before choosing an exposed location.
Before leaving it in place, open and close the door gently and watch for shifting decorations or a swinging base. Reposition or remove a loose piece. No craft construction here is a wind rating. If the wreath moves excessively, bring it inside instead of adding more weight to hold it still.
A few wreath questions
What is the easiest Christmas wreath to make without glue?
The cotton tie wreath uses folded fabric hitches on a metal ring and a tied hanging ribbon. Cut a few sample strips first, then adjust the length for your fabric before making the full batch. It is repetitive rather than technically difficult.
Can I use one wreath base for every idea?
Different bases do different jobs. A thin ring carries fabric ties, grapevine gives wire places to grip, foam supports close yarn wrapping and a flat cardboard band supports paper leaves. Switching bases can change both the appearance and the attachment method. Follow the base specified in the build you choose.
How should I store a homemade Christmas wreath?
Let it dry fully, remove it from the door and check for loose attachments. Keep it in a dry box deep enough to avoid crushing the front. Support a paper wreath flat, keep fabric and yarn away from dampness, and store wire ends tucked into the back. Replace damaged paper or loose attachments before hanging it again.
Made it? Tell us how it went