8 Pom Pom Crafts With Materials and Step-by-Step Instructions
Start with purchased pom poms or make your own from yarn, then turn them into eight practical paper crafts and small decorations.
By Mustafa Demir
Updated November 18, 2026
Project at a glance
- Time
- About 15 to 45 minutes of active work per project, plus glue drying
- Cost
- Basic paper, yarn and purchased pom poms; use supplies already on hand where possible
- Skill
- Beginner gluing and folding, with adult help for sharp scissors
- You make
- 8 pom pom crafts using purchased pom poms and handmade yarn pom poms
Choose your pom pom before choosing your project. Purchased craft pom poms work well for flat paper decorations because their sizes are predictable and there is no yarn cutting to finish first. Handmade yarn pom poms suit a gift topper, bag charm or garland where their longer, uneven fibers are part of the appearance.
The first five projects use purchased pom poms; the last three explain how to make and use yarn ones. Each idea includes its own materials list and three numbered steps. Start with one project and a small batch, especially if you are fitting the work around a family afternoon.
Imagine a shared table with one person folding a card while an older child sorts colors on a tray. Separate trays would help keep loose pom poms and yarn clippings contained. Match the activity to the child, keep loose pom poms away from toddlers and children who mouth objects, and put the supplies away afterward. Adults should handle sharp scissors and the ring-cutting step.
For more projects using leftover yarn, browse the yarn crafts collection. Keep the finished decorations indoors and dry. A secure center tie matters for handmade pom poms, while enough glue contact and patient drying matter most for the purchased kind.
If I were setting up these projects at a family table, I would give each person a shallow tray and start with the flower card. I would save the yarn cutting for a separate spot so loose clippings stayed away from the paper pieces.
Start with purchased pom poms
Pom-pom color-sort mat
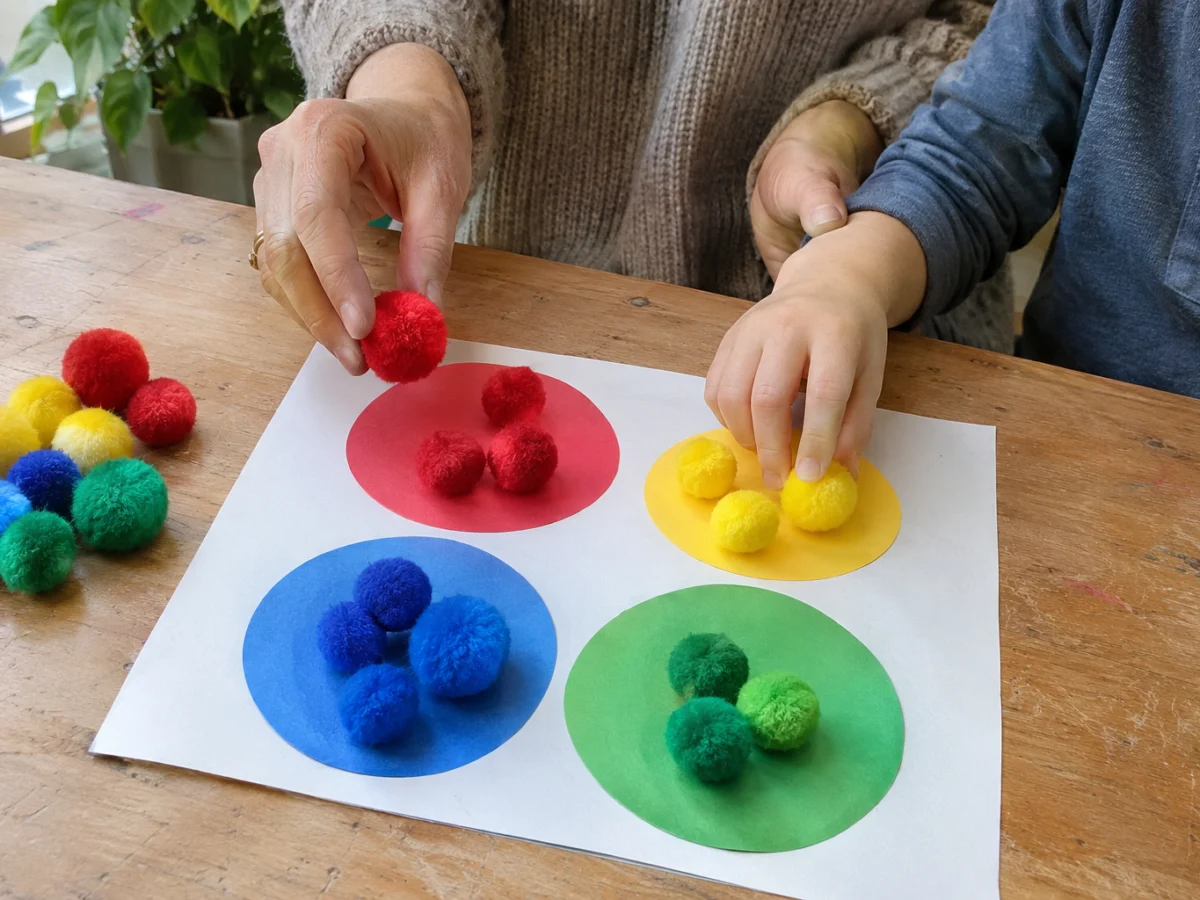
A sheet of paper becomes a simple sorting station when you add big colored paper circles. Choose four colors and a small handful of matching purchased pom poms. This is a supervised table activity for children who can use loose small parts appropriately, not a toddler toy or a sensory bin to leave out.
Materials
- White paper or cardstock
- Colored paper in four colors
- Scissors and paper glue
- 12 to 16 purchased pom poms in matching colors
- Shallow tray
Steps
- Cut four paper circles about 3 inches across in different colors. Glue them onto the white sheet with room between them and let the paper dry flat. Set the sheet inside a shallow tray and put three or four pom poms of each matching color beside it.
- Invite the child to place each pom pom in its matching circle using fingers. Start with only two colors if four feels confusing. For an older child, ask for a row of three inside each circle or a repeating color sequence along the bottom edge.
- Gather and count the pom poms when the activity ends, then put them in a closed container out of reach. If the paper slides, tape its corners to the tray before using it again. Replace a fuzzy, torn pom pom instead of continuing to handle loose fibers.
Pom-pom caterpillar on a paper leaf
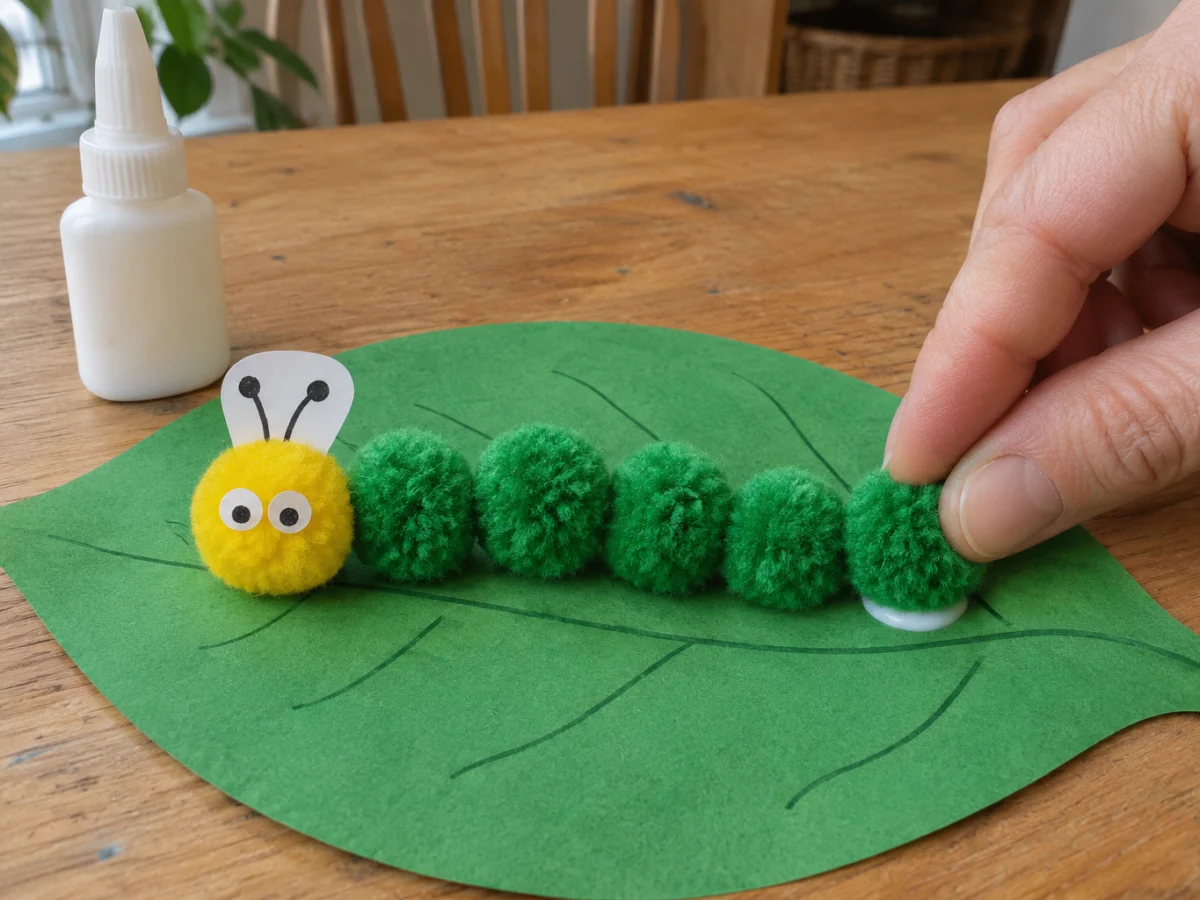
Five green body pom poms and one yellow head make a short caterpillar on a broad cardstock leaf. Flat paper eyes add a face without loose plastic pieces. The leaf is a display base, so choose cardstock that stays level under the glued pieces.
Materials
- Green cardstock
- Five green purchased pom poms and one yellow pom pom, about 1 inch wide
- Small white and black paper scraps
- Pencil and scissors
- White craft glue suitable for the materials
Steps
- Draw a leaf about 8 inches long and 4 inches wide on green cardstock. Cut it out and draw a central vein. Arrange five green body pom poms and a yellow head in a gentle curve with their sides touching, leaving a visible leaf border around the caterpillar.
- Lift one pom pom at a time and add a small puddle of craft glue underneath. Press it onto the leaf and hold briefly. Use enough glue to contact the fibers without flooding the base, then leave the leaf flat while the adhesive dries according to its label.
- Cut two small white paper circles and add black pupils with paper or marker. Glue them onto the yellow head, then add two short black paper antennae. Let the face dry before lifting the leaf with both hands. If the cardstock bends, glue a second leaf shape underneath as a backing.
Pom-pom flower greeting card
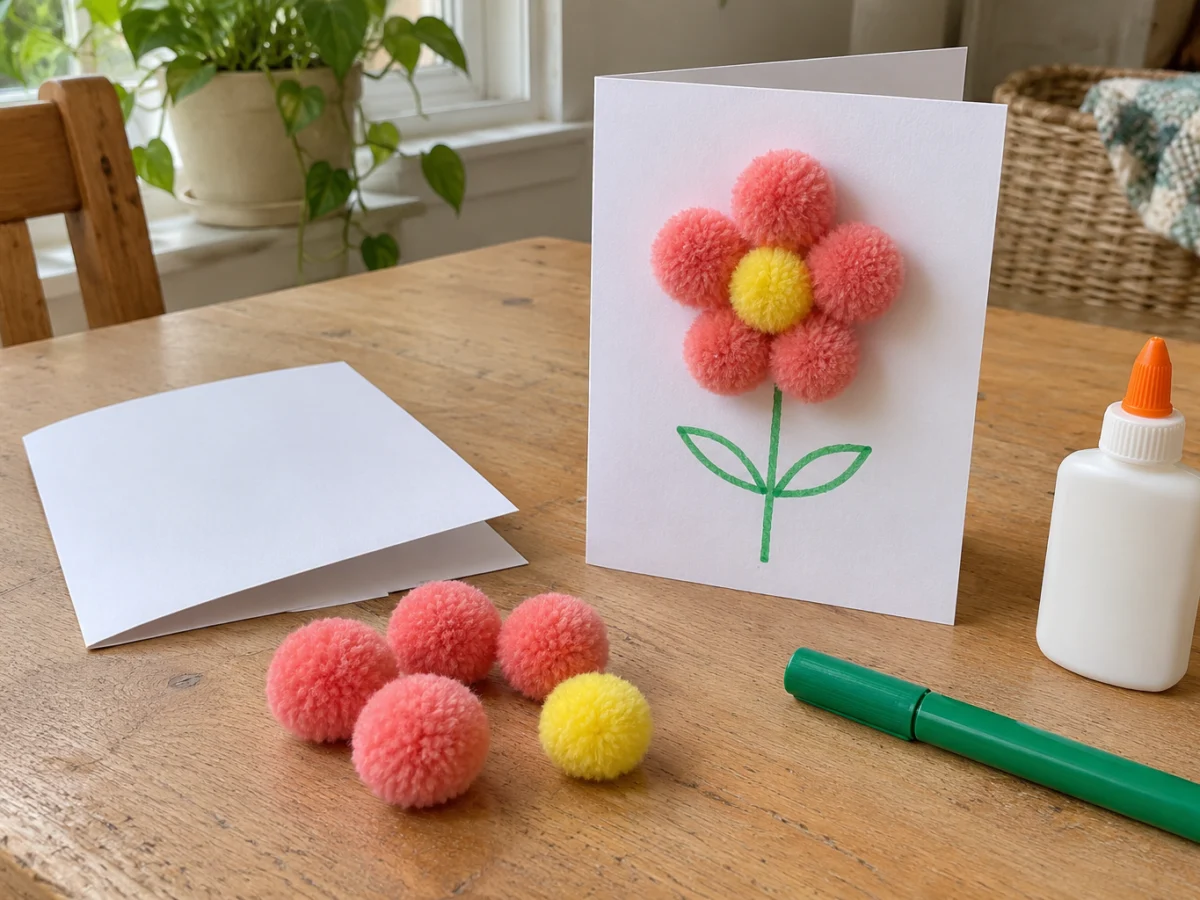
Five coral-pink pom poms surround a yellow center on a folded cream card, with a drawn green stem below. Lay out the flower before gluing so every petal fits. Choose a card for handing over in person because raised flowers can be crushed in an ordinary envelope.
Materials
- Cream cardstock, 8 by 6 inches
- Five coral-pink purchased pom poms and one yellow center pom pom
- Green marker
- Ruler and scissors
- White craft glue
Steps
- Fold the cardstock in half to make a 4-by-6-inch card with the fold on the left. Arrange the yellow pom pom in the upper half, then place five coral-pink pom poms around it as petals. Mark the flower position lightly and move the pom poms aside.
- Draw a green stem from beneath the marked flower toward the bottom of the card and add two simple leaves. Avoid marking the future glue spots. Write the inside message now, while the card can still lie comfortably on the table.
- Glue the yellow center and five petals into position, then leave the card flat and open until the glue dries. If a petal tips sideways, support it with folded scrap paper while it sets. Give the finished card in a shallow box or by hand so the flower keeps its shape.
Make small paper decorations
Pom-pom corner bookmark
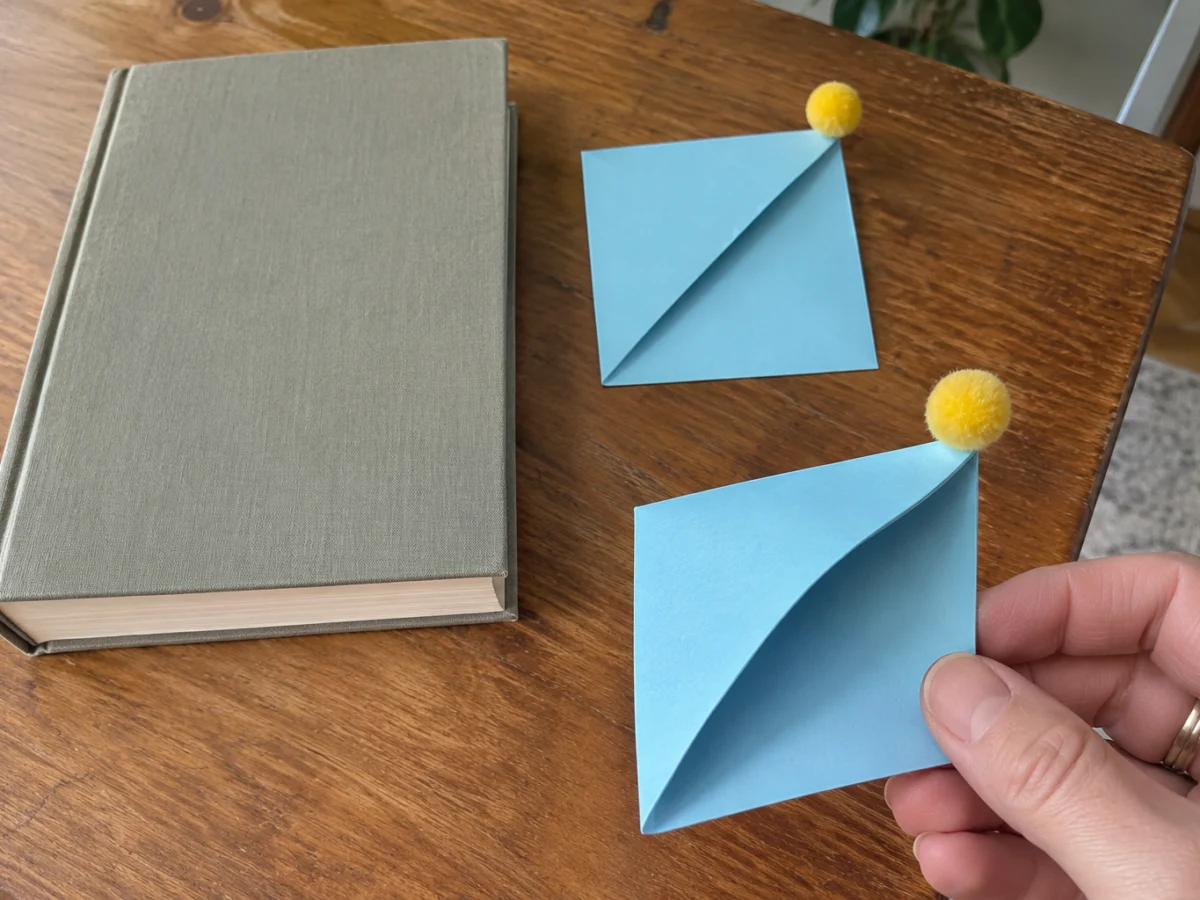
A folded cardstock pocket slips over a page corner, with one small pom pom sitting on the outside tip. Use a light decoration and leave the pocket roomy. This bookmark is better for a desk book than a tightly packed school bag where a raised pom pom can catch.
Materials
- Lightweight cardstock square, 6 by 6 inches
- One purchased pom pom, about 3/4 inch wide
- Scissors
- Craft glue suitable for paper and fibers
Steps
- Fold the square diagonally into a triangle with its long fold at the bottom. Bring the left and right corners up to the top point, crease and unfold them. Fold only the front layer of the top point down to the middle of the bottom edge, creating a flap.
- Bring the left and right corners up again, then tuck each point behind the folded-down flap. Flatten the pocket gently. Try it on a spare book page before decorating: the page corner should slide into the pocket without bending or needing force.
- Remove the bookmark from the book. Glue the pom pom to the outside closed tip, keeping glue away from the opening and inner pocket. Let it dry fully before replacing it on a page. If thick cardstock makes the folds spring apart, remake it in lighter paper rather than gluing the pocket shut.
Three-pom-pom gift tag
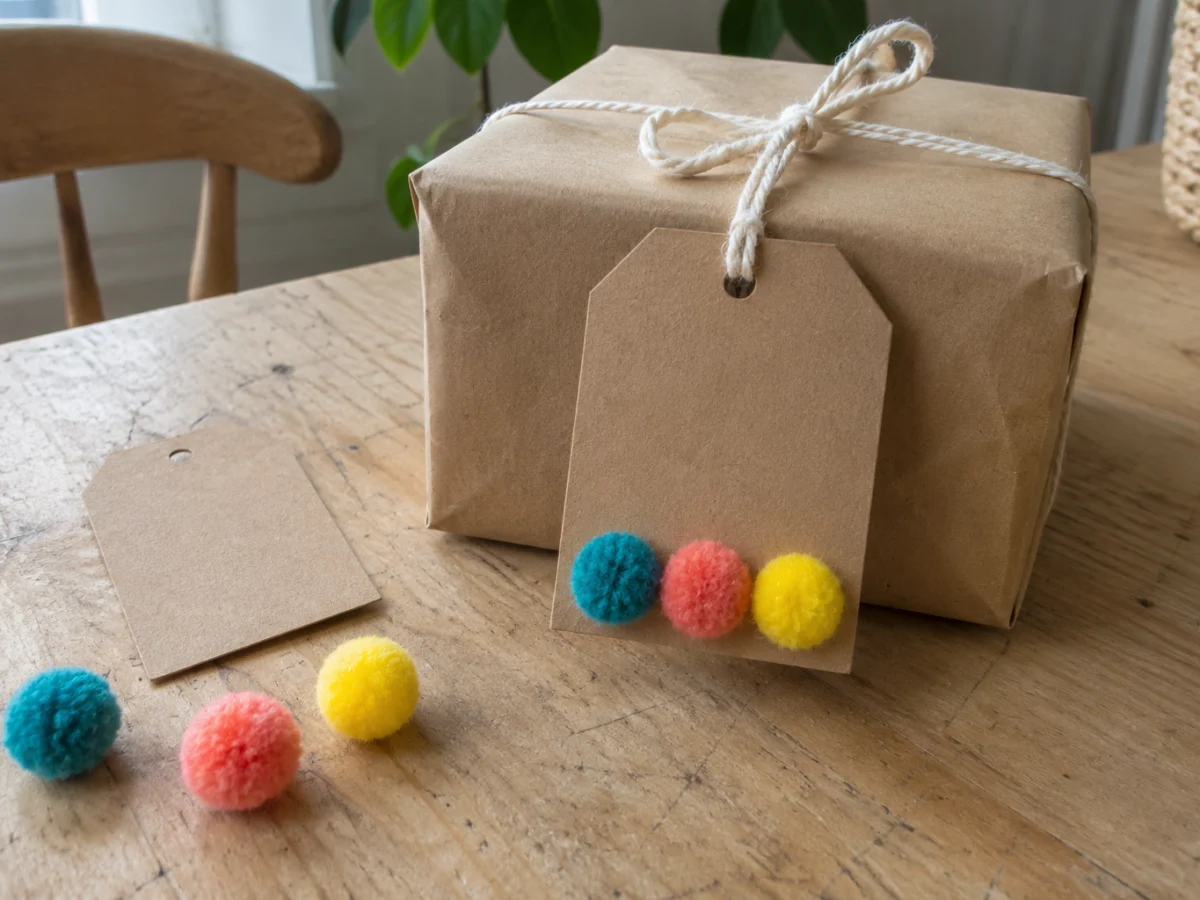
Three small pom poms line the bottom of a rectangular gift tag, leaving the upper section clear for a name. The cardstock does the carrying here; the pom poms are decoration. Tie the tag loosely to a package instead of using it as a handle.
Materials
- Cardstock rectangle, 2 1/2 by 4 inches
- Three purchased pom poms, about 1/2 inch wide
- Hole punch
- Pen
- Craft glue
- Cotton cord
Steps
- Cut the cardstock rectangle and snip the top two corners if you want a tag shape. Punch a hole near the top, leaving at least 1/2 inch of paper above it. Write the recipient’s name before adding any raised decoration.
- Arrange three pom poms along the bottom edge, with a small margin of cardstock visible beneath them. Glue each in place and leave the tag on a flat surface until dry. Avoid covering the name area so the finished tag stays easy to read.
- Thread cotton cord through the hole and knot it onto gift ribbon or a bag handle. Support the tag while tying so it does not twist against wet glue. For a weak or torn hole, remake the tag or add a second cardstock layer before punching again.
Make your own yarn pom poms
Fork-made yarn pom-pom gift topper
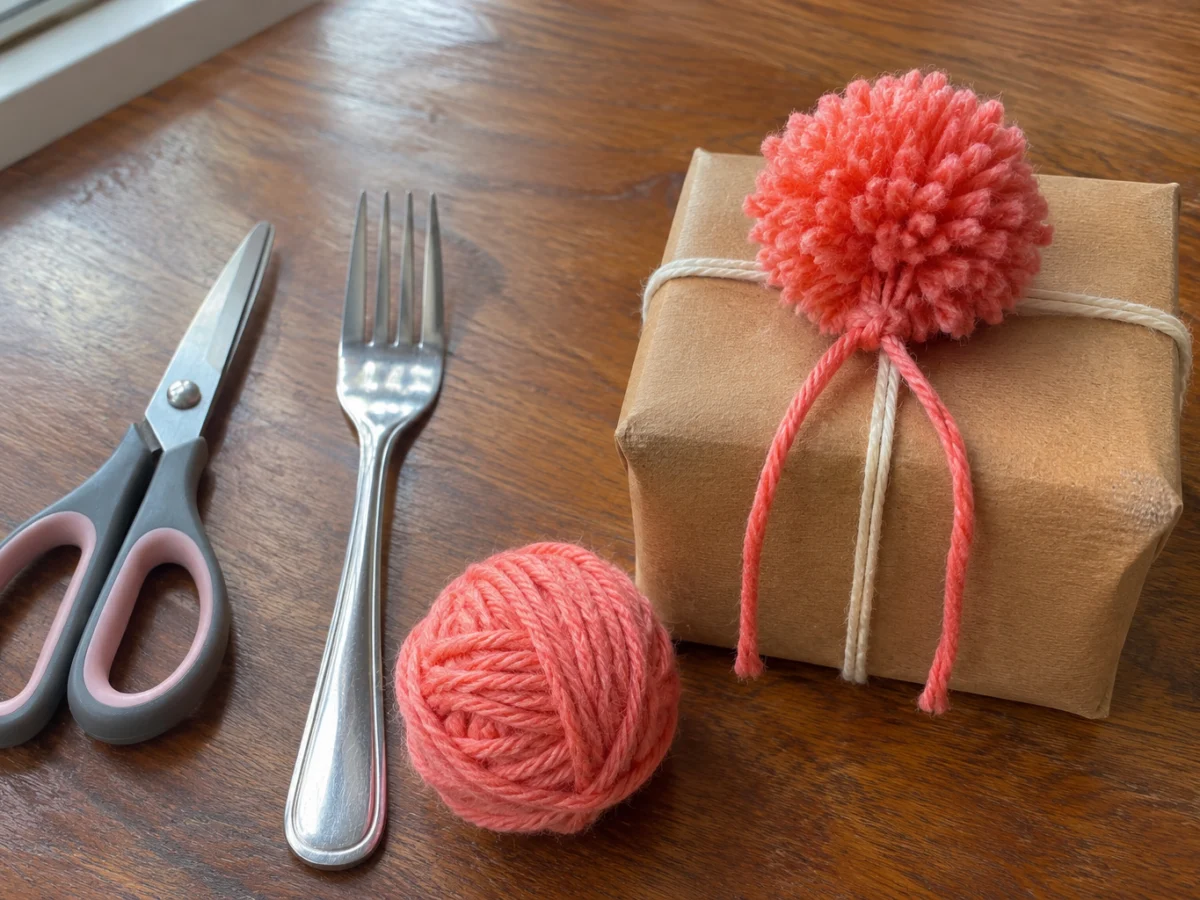
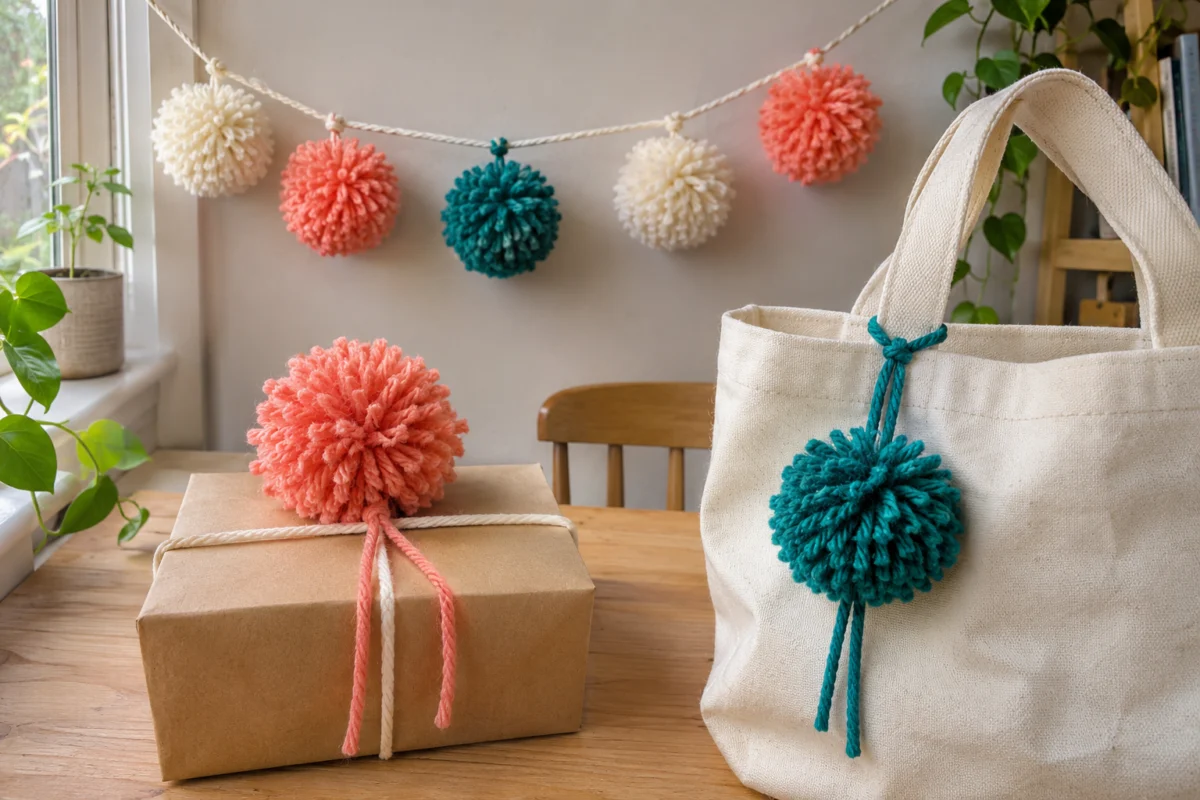
A dinner fork helps make one compact yarn pom pom for a wrapped gift. Use medium-weight yarn and leave the center tie long enough to fasten around the package ribbon. The finished size depends on the fork, yarn and trimming, so make one sample before planning a matching batch.
Materials
- Medium-weight yarn in one color
- Four-tine dinner fork
- Separate 12-inch piece of strong yarn or cotton tying thread
- Sharp scissors for adult use
- Wrapped gift with ribbon
Steps
- Lay a separate 12-inch tie through the fork’s middle gap, keeping both ends accessible. Wrap the working yarn around the fork’s full width below the tine tips, leaving room near the base. Build an evenly padded bundle without pulling so tightly that it cannot slide off, then cut the working yarn.
- Pass the separate tie through the middle gap of the fork, take it around the center of the bundle and pull firmly. Make a secure double knot while the yarn is still supported, then slide the bundle off. Tighten and knot again if the center loosens as it leaves the fork.
- Hold the long tie ends aside. Have an adult cut the folded loops on both sides, fluff the strands and trim the uneven ends over a tray. Tie the pom pom onto the gift ribbon with its long center tails. If strands pull free, remake it with a tighter center tie before using it.
A firm center tie holds the cut strands together. Clover also uses a securely double-knotted center tie in its pom-pom maker directions; the fork and cardboard templates here are separate home methods. Clover pom-pom maker instructions
Cardboard-ring pom-pom bag charm
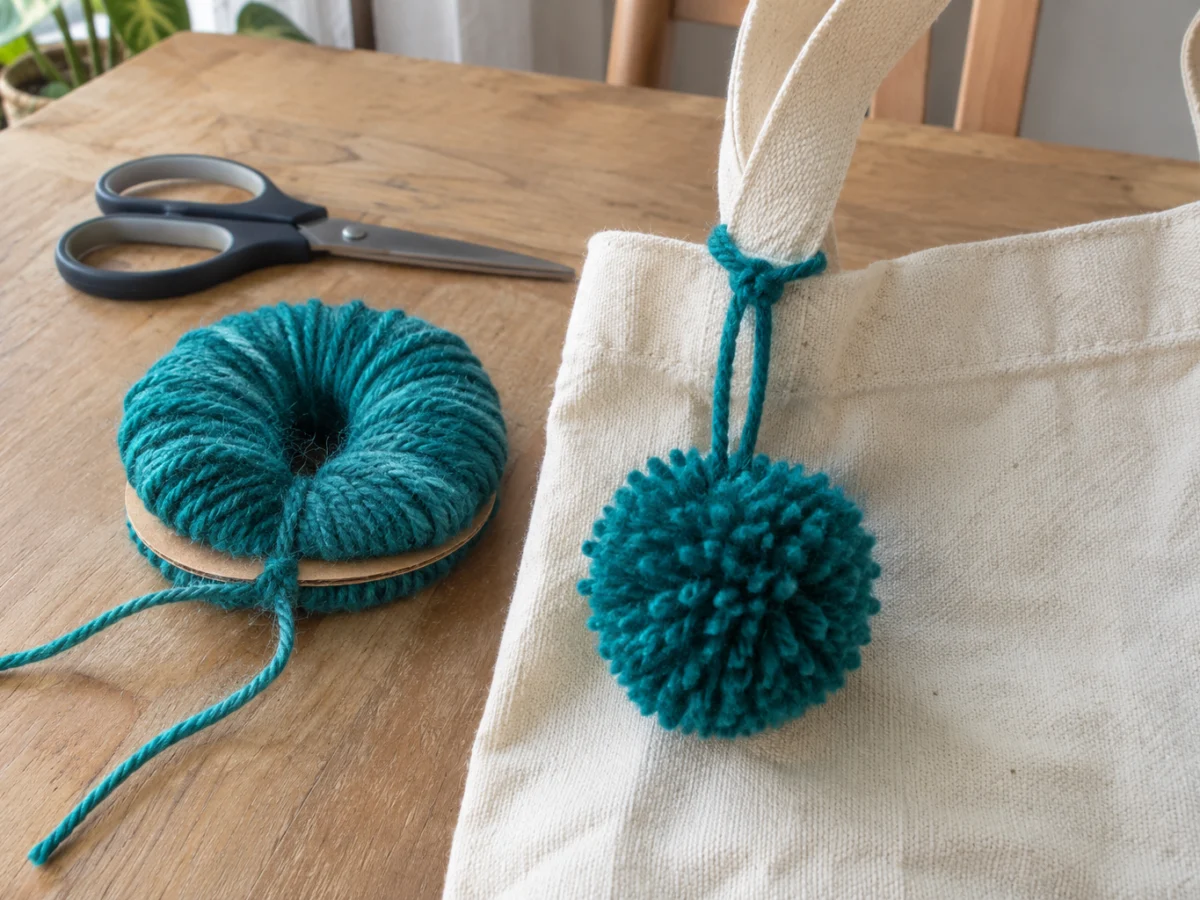
Two cardboard rings make a larger yarn pom pom with a tie captured around its center. Attach it to the handle of an adult’s lightweight tote as a decorative accent. It is not a toy, zipper pull or weight-bearing handle, and repeated rubbing will eventually roughen the yarn.
Materials
- Scrap cardboard
- Pencil and round objects for tracing
- Yarn
- Strong cotton tying thread, about 18 inches
- Scissors for adult use
- Adult tote bag
Steps
- Trace and cut two matching cardboard rings about 3 inches across with 1-inch center holes. Cut a narrow slit through each ring so yarn can pass through. Stack the rings with the slits aligned, then wrap yarn around them until the ring looks evenly covered and the center opening is nearly filled.
- An adult should insert the scissors between the two cardboard layers at the outside edge and cut the wrapped yarn all the way around. Hold the rings pressed together so the short strands stay trapped. Slip the strong thread between the rings, pull it tightly around the bundle’s center and tie several secure knots.
- Remove the cardboard rings carefully, fluff the yarn and trim to a round shape while keeping the long thread ends clear. Use those ends to tie the charm securely around a tote handle. Check it after handling; if the center loosens or fibers shed heavily, remove the charm and remake it.
Tied-yarn pom-pom garland
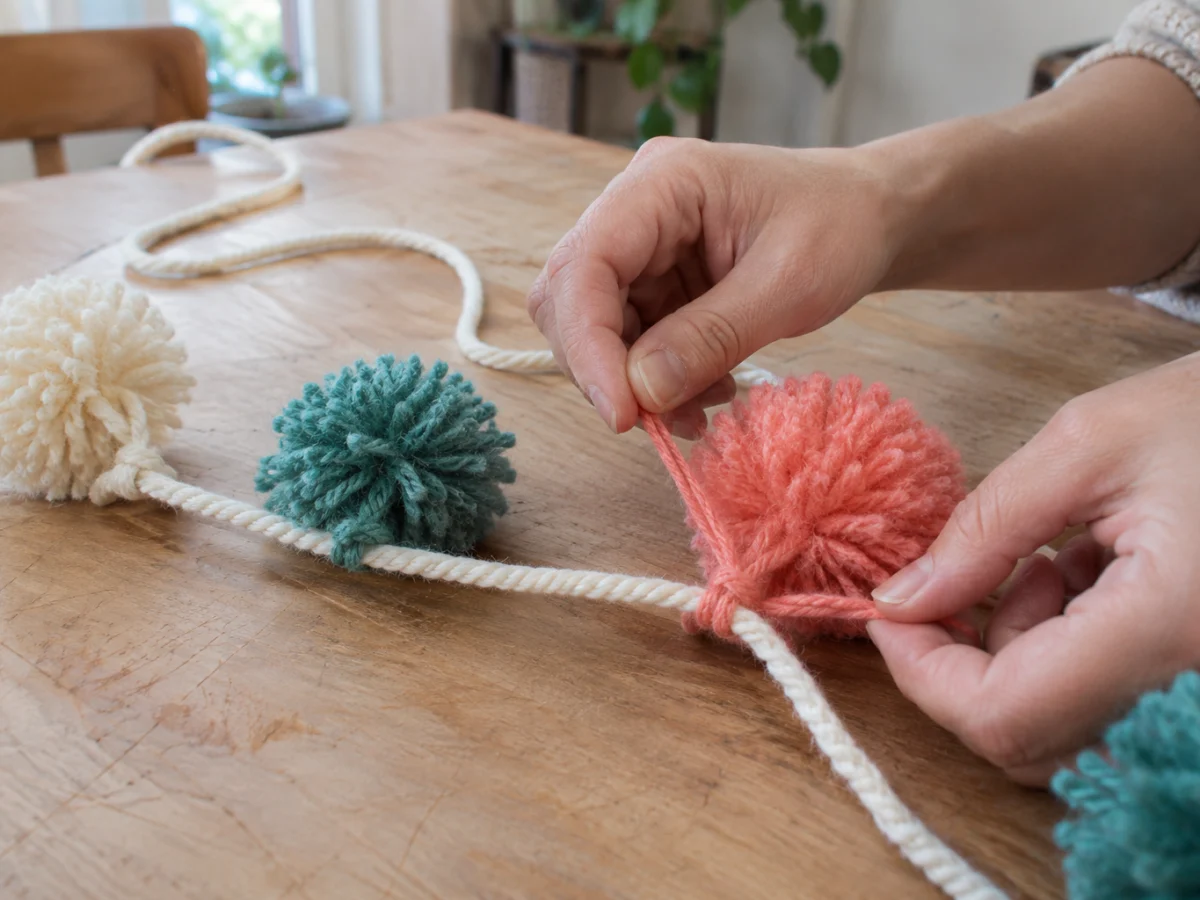
Five handmade yarn pom poms hang from a cotton cord with their center ties, so there is no need to push a needle through the fluffy balls. Repeat two colors or use leftover yarn from one weight range. This is indoor decoration for an adult to hang high, away from children and pets.
Materials
- Five yarn pom poms made by the cardboard-ring method, each with long center ties
- Cotton cord, about 5 feet
- Scissors
- Suitable removable hanging hooks
Steps
- Make five pom poms using the ring method above, keeping their center tie ends at least 6 inches long. Trim them to roughly equal sizes. Lay the cotton cord across a table and arrange the pom poms below it, leaving clear cord at both ends for hanging.
- Tie each pom pom’s center tails around the cord with a firm double knot. Start in the middle and work outward, adjusting spacing before tightening the knots. Lift the cord a few inches above the table to check that each pom pom hangs from its center instead of slipping along the cord.
- An adult can hang the garland from suitable hooks in a high indoor spot away from beds and play areas, following the hook directions. Leave a gentle curve rather than pulling the cord tight. Keep it away from heat and out of reach; take it down if a pom pom loosens or the cord sags into an accessible area.
Common questions
Can you use purchased pom poms instead of making yarn ones?
Use purchased pom poms for the sorting mat, caterpillar, flower card, bookmark and gift tag. Handmade yarn pom poms have a center tie that makes the topper, charm and garland easier to attach. A purchased pom pom usually has no useful tie tails, so it is not a direct substitute for those hanging methods.
Why does a handmade pom pom fall apart?
The center tie may be too loose, or it may have slipped as the bundle came off the tool. Pull the tie firmly around the middle and secure it before cutting the loops. If strands pull out easily after trimming, remake the pom pom. Extra surface glue will not reliably fix a weak center.
What glue works for pom pom crafts?
For paper projects, begin with a craft glue labeled for the materials you are joining. Test one pom pom on scrap cardstock because fibers and glue formulas vary. Let the joint dry fully before lifting it. A bigger blob can soak the paper without reaching more fibers; press the pom pom into a small, well-placed puddle instead.
How do you trim yarn pom poms without making a mess?
Work over a shallow tray and turn the pom pom a little after each small cut. Keep the center tie tails separate so you do not cut them off. Trim the longest strands first, then stop when the shape is even enough for its use. Gather the clippings before moving the tray or clearing other supplies.
Made it? Tell us how it went